
Growing garlic is a long game. You plant it in the fall, wait out the winter, and spend most of spring watching it slowly grow taller.
And then, just when it seems like nothing much is happening, a narrow window opens, and if you miss it, months of effort produce bulbs that don’t store well.
Knowing exactly when to harvest garlic is the difference between heads that last a year in your pantry and ones that go soft or moldy within weeks. It’s not complicated, but it does require paying attention to the right cues at the right time.
This guide covers what to look for, how to test before you pull, why timing matters so much, and everything you need to do after the harvest to get the most storage life out of your garlic.
When To Harvest Garlic: Two Signs Garlic Is Ready
You don’t need a calendar to tell you when garlic is ready; the plant tells you itself through its leaves.
Garlic develops one leaf per wrapper layer around the bulb. As the plant matures, the lower leaves yellow and die back, while the upper leaves stay green. Each dead lower leaf corresponds to one less wrapper protecting the bulb.
The rule of thumb: Harvest when roughly half the leaves are brown (starting from the bottom) and half are still green.
- Too many brown leaves = wrappers have deteriorated, and bulbs won’t store well
- Too many green leaves = bulbs aren’t fully sized yet
Harvest timing varies by variety and climate, but most garlic is ready to harvest in late June to early July in most of the US, about 8–9 months after fall planting. (See our guide on how to plant garlic from cloves if you’re not sure whether or not you’re planting correctly.)
The Test Dig
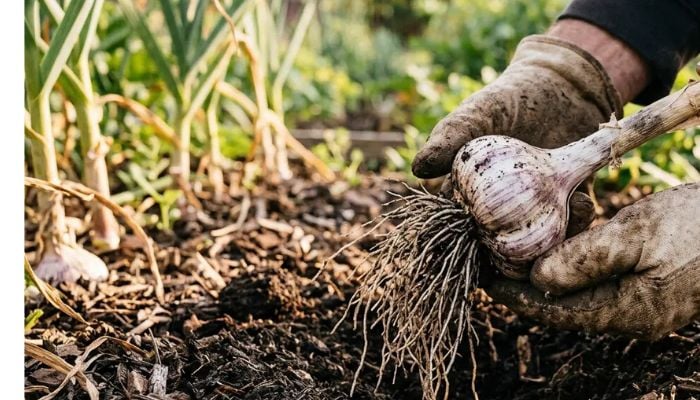
If you’re unsure, don’t pull the whole crop. Dig one bulb from the edge of your row.
Use a garden fork or spade, and push it into the ground several inches away from the base of the plant to avoid cutting the bulb. Lever it up gently, and pull the bulb free.
Look at it:
- Is the bulb well-formed with distinct cloves?
- Are the wrappers intact and papery?
- Does it feel full and firm?
If yes, harvest. If the bulb looks underdeveloped or the cloves seem small, give it another week and test again.
Why Timing Matters
Harvesting too early means smaller bulbs with fewer developed cloves. You can still eat them. The flavor’s there, but the yield is lower than it could be.
Harvesting too late is a bigger problem. Once too many leaves die back, the outer wrapper layers break down. Without those papery layers, the bulbs lose their protective skin and won’t store nearly as long. Late-harvested garlic is more prone to mold, splitting, and drying out.
There’s about a two-week window when garlic is at peak harvest readiness. Checking your plants every few days during June makes it easy to catch it.
How To Harvest Garlic
Choose a dry day to harvest if you can. Wet soil clings to the bulbs and makes cleanup harder.
Loosen the soil with a fork before pulling. Don’t yank garlic out by the stem; that can damage the neck, which reduces storage life. Work the fork in 4–6 inches away, loosen, and then pull from the base.
Brush off large clumps of soil with your hands. Don’t wash the bulbs; water shortens storage life. Leave roots and stems intact for now; you’ll trim them after curing.
Avoid leaving harvested garlic in direct sun for more than an hour. UV exposure can damage the outer wrappers.
How To Cure Garlic
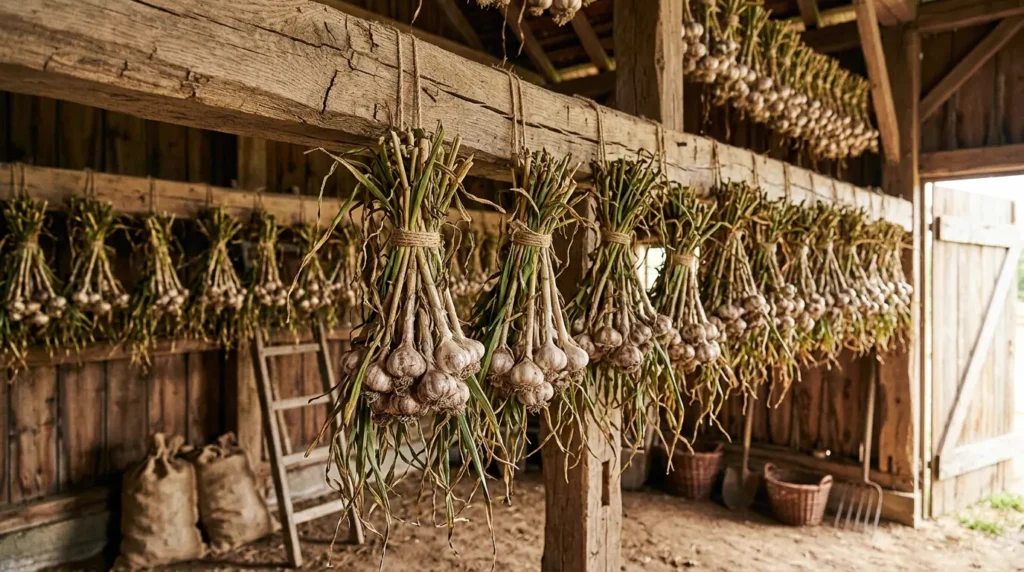
Curing is what turns freshly pulled garlic into the long-storing bulbs you’re used to seeing. It dries out the skin and neck, sealing the bulb and dramatically extending shelf life.
Where to cure: A dry, shaded spot with good airflow. A covered porch, garage, barn, or shed works well. Avoid direct sun and anywhere that’s humid.
How to hang or lay: You have two options:
- Bundles: Tie 8–12 plants together at the stems with twine, and hang them upside down.
- Racks or screens: Lay bulbs in a single layer on a screen or mesh rack with the stems still attached.
How long: Cure for 3–4 weeks. The stems and roots should feel dry and papery, and the outer wrapper should be tight and fully dry.
Good airflow matters more than temperature. If you notice mold developing, move the garlic somewhere with better circulation and spread the bundles out.
After Curing: Trimming, Braiding, and Storage
Once curing is complete:
- Trim the roots close to the base of the bulb with scissors or pruners.
- For hardneck varieties, cut the stem to about 1 inch above the bulb.
- For softneck varieties, you can either cut the stems or braid the bulbs while the stems are still slightly pliable (usually around week 2 of curing).
Braiding softneck garlic: Softneck stems stay flexible enough to braid, which is both practical and a good way to hang storage bunches in your kitchen. Work with three bulbs at a time, braid the stems together the way you’d braid hair, and add bulbs as you go. Finish with a knot or loop of twine, and hang in a cool, dry spot.
Hanging hardneck garlic: Hardneck stems are too stiff to braid. Trim to 1 inch, and store in mesh bags, open baskets, or small crates, i.e., anywhere with airflow.
Storage Life by Variety
How long garlic keeps depends heavily on the variety:
- Softneck varieties (Artichoke, Silverskin): Up to 9–12 months in good conditions
- Hardneck varieties (Rocambole, Porcelain, Purple Stripe): Typically 4–6 months
Regardless of type, garlic stores best between 55–65°F with moderate humidity (around 50%). Avoid the refrigerator; cold temperatures can trigger sprouting. A cool pantry, cellar, or unheated room works better than most kitchen counters.
Check your stored garlic every few weeks. Pull any bulbs that show soft spots, mold, or sprouting, and use those first.
Nail Your Garlic Harvest, Maximize Storage Life
Garlic is one of the most rewarding things you can grow, but only if you stick the landing at harvest time. The effort you put in over those 9 months pays off in bulbs that last through the winter, long after the rest of your summer garden is a memory.
Pay attention to those leaves, do a test dig if you’re unsure, give the bulbs a proper cure, and your garlic will be in great shape well into the following year.
Once your garlic is out of the ground, you’re left with free garden space. Check out our guide on what to plant after garlic to make sure your garden keeps working as hard as you do.