
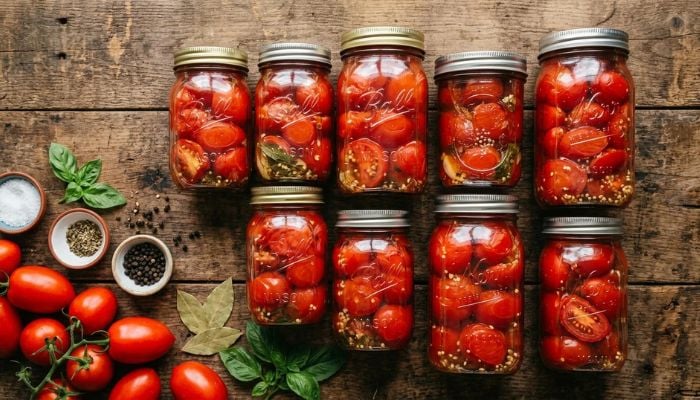
Home-canned tomatoes are one of those pantry staples that make you feel genuinely self-sufficient.
Open a jar in the middle of February, and the smell alone, which is sweet, acidic, and faintly grassy, brings summer right back into your kitchen. You grew them, you packed them, and you made them last.
Not sure how to can tomatoes? The water bath method is the right choice for tomatoes. It is accessible for beginners, requires no pressure canner, and has been used safely in home kitchens for generations.
That said, there are a few non-negotiable safety steps, particularly around acidification, that you need to follow every single time. Get those right, and you have a forgiving, beginner-friendly process that scales from one box of tomatoes to a full season’s haul.
This guide covers everything: equipment, choosing and prepping tomatoes, the step-by-step process, processing times by altitude, and a troubleshooting breakdown for the most common problems.
If you’re brand new to preserving, it’s worth reading our Canning for Beginners guide first. It covers the foundational concepts that apply to all water bath projects.
What You’ll Need Before You Start
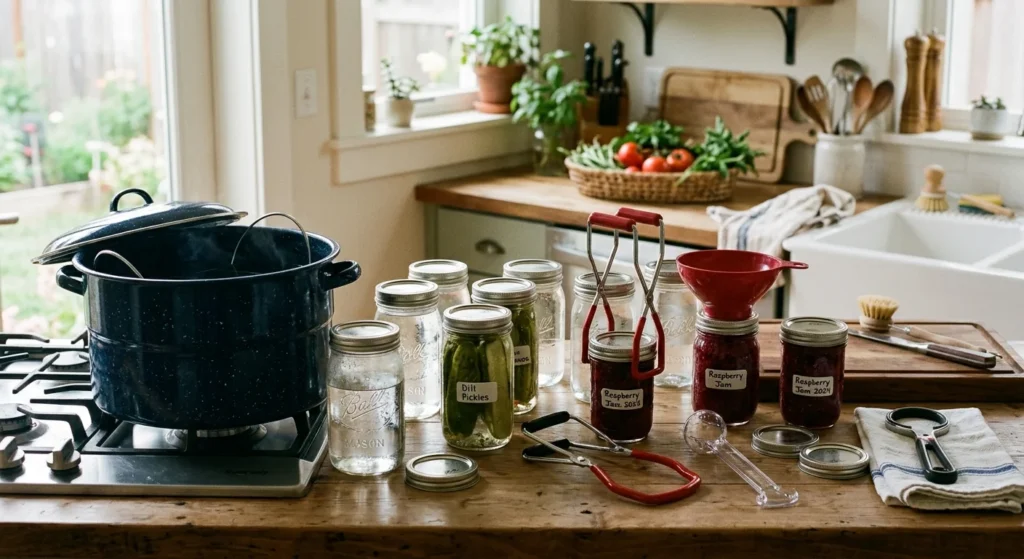
You don’t need a lot of specialized equipment, but having the right tools assembled before you start makes the whole process smoother and far less stressful. Nothing derails a canning batch faster than scrambling for a missing tool with a pot of boiling water on the stove.
The Water Bath Canner and Rack
A water bath canner is simply a large, deep pot, deep enough to keep jars fully submerged under at least 1 inch of boiling water.
Most canners come with a fitted rack that holds jars off the bottom, allowing water to circulate underneath. That circulation matters. It ensures even heat penetration and prevents jars from cracking due to direct contact with the pot floor.
Don’t have a dedicated canner? A large stockpot with a round cooling rack set in the bottom works as a substitute. The pot just needs to be deep enough for jars plus 2 inches of water above the lids.
Jars, Lids, and Bands
Always use mason jars designed for home canning: Ball, Kerr, or equivalent. Never repurpose commercial food jars (pasta sauce, salsa, pickles, etc.) for water bath processing. They’re made for one-time sealing, not repeated thermal stress, and can fail silently.
Use new lids every time. The sealing compound on the lid is single-use only. Once it’s been heat-processed, the material compresses and won’t form a reliable seal a second time. Bands (the screw rings) can be reused if they’re free of rust, dents, and corrosion.
For tomatoes, quart jars are the most practical size; each holds about 2.5 pounds of tomatoes and gives you a useful, meal-sized quantity per jar. Pint jars work well if you cook for one or two people and prefer smaller portions.
Essential Tools
- Jar lifter: Essential; your bare hands cannot safely grip hot jars out of boiling water.
- Wide-mouth canning funnel: Keeps rims clean and packing fast.
- Bubble remover or thin spatula: Releases trapped air pockets in packed jars.
- Lid wand or small tongs: For handling hot lids without contaminating the sealing compound.
- Clean towels: For jar rims and as a cooling surface.
- Permanent marker: For labeling sealed jars with date and contents.
Choosing the Right Tomatoes
The single biggest factor in a successful batch is starting with the right tomatoes.
Use fully ripe, meaty tomatoes, deeply red and firm but giving slightly under gentle pressure, with no soft spots, cracks, or signs of mold.
Roma tomatoes (also called paste or plum tomatoes) are the top choice for canning because of their thick flesh, low seed count, and reduced water content. Less water in the tomato means less liquid in the jar and a richer, more concentrated flavor once canned.
Beefsteaks, heirlooms, and mixed garden tomatoes all can well too; expect a looser texture in the finished product, which is perfectly fine for soups, stews, and sauces. The variety matters far less than the quality.
Avoid overripe or damaged tomatoes. Fruit that is beginning to break down has lower natural acid content and a higher risk of introducing mold into your batch.
Cutting out the bad spots isn’t enough; the compromised acidity is distributed throughout, which is a safety problem in water bath canning.
Plan on about 21 pounds of fresh tomatoes for 7 quart jars, or 13 pounds for 9 pint jars. Yields vary by variety; meatier tomatoes give more product per pound.
How To Blanch and Peel Tomatoes
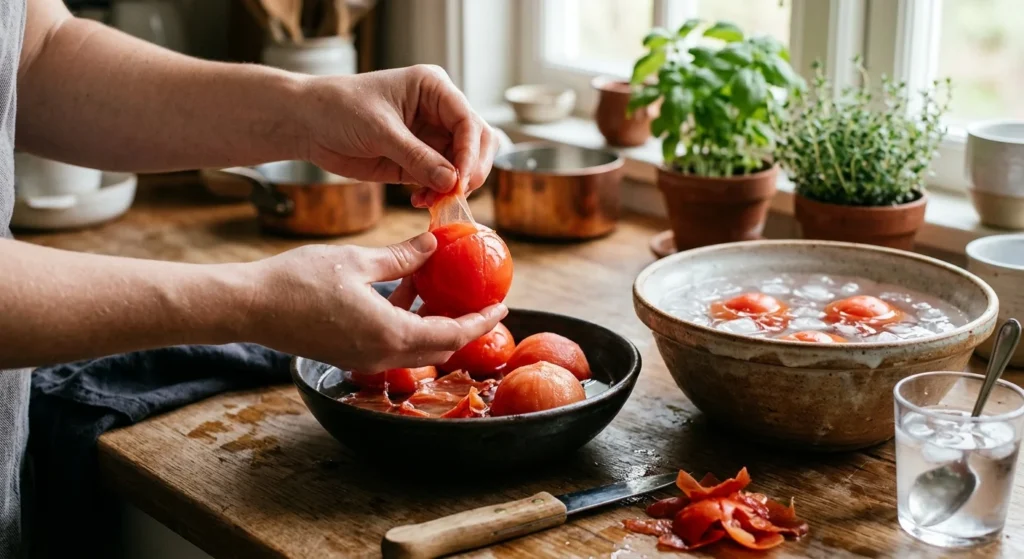
Peeling is worth the effort. Tomato skins become tough, papery, and unpleasant once canned. Blanching makes it fast—the skins slip off in seconds.
- Bring a large pot of water to a full rolling boil. Set a bowl of ice water next to the stove.
- Score a shallow X on the bottom of each tomato with a paring knife, just enough to break through the skin.
- Lower 3–4 tomatoes into the boiling water. Wait 30–60 seconds, watching for the skin to curl away from the scored X.
- Lift tomatoes out with a slotted spoon and drop them immediately into the ice water. Leave them for 1–2 minutes.
- Peel from the X. Skins should slip right off. If the skin resists, the tomato needs another 15 seconds in the boiling water.
- Core each tomato (remove the stem end and any green or white interior), and cut as needed; halves or quarters for whole-pack, and rough chops for crushed.
Work in batches, and keep your ice water cold by replenishing ice as you go. Don’t let tomatoes sit in the ice bath for more than a few minutes, or they’ll start to absorb water.
Why Acid Is Non-Negotiable
This is the single most important safety step in tomato canning. It is not optional.
Tomatoes sit right on the borderline of safe acidity for water bath processing. Modern tomato varieties bred for sweetness can have a pH that’s higher (less acidic) than older varieties.
Without added acid, the pH inside the jar may be high enough for Clostridium botulinum, which is the bacterium responsible for botulism, to survive the water bath process.
Botulism toxin is colorless, odorless, and tasteless. You cannot detect it by looking at or smelling a jar. It’s also extremely dangerous. The solution is simple and adds almost nothing to the process: add measured acid to every jar, every time, with no exceptions.
Your two USDA-approved options:
- Citric acid powder: ¼ teaspoon per pint, ½ teaspoon per quart. Reliable, inexpensive, and has no noticeable effect on flavor.
- Bottled lemon juice: 1 tablespoon per pint, 2 tablespoons per quart. Use bottled only, not fresh. Bottled lemon juice has a standardized, tested acid level. Fresh lemon juice varies batch to batch.
Do not substitute vinegar, lime juice, or any other acid. These have not been tested and approved for this application.
How To Can Tomatoes Using the Water Bath Method

With your tomatoes prepped and equipment ready, here’s the full process from start to seal.
- Sterilize your jars. Run jars through the dishwasher on a hot wash cycle, or boil them submerged in your canner for 10 minutes. Keep them hot until you’re ready to fill. Cold jars introduced to a hot product can crack.
- Warm your lids. Place lids in a small saucepan, cover with water, and bring to a gentle simmer (not a boil). Keep them in the hot water until needed. This softens the sealing compound for a better seal.
- Heat your canner. Fill the canner about halfway with water, and bring it to a low simmer while you work through the next steps.
- Add acid first. Before any tomatoes go in, add the correct amount of citric acid or bottled lemon juice directly to the bottom of each jar.
- Pack the tomatoes. For whole or halved tomatoes, pack them firmly into the hot jar, pressing down as you go to fill air pockets and release some natural juice. For crushed tomatoes, heat prepped tomatoes in a pot, stirring frequently, until they release their liquid and come to a boil, and then ladle hot tomatoes and liquid into jars.
- Add salt (optional). ½ teaspoon per pint, 1 teaspoon per quart. Salt is a flavor addition only; it plays no role in preservation or safety.
- Remove air bubbles. Run a bubble remover or thin spatula around the inside of the jar to release trapped air. Top off with additional tomato or boiling water if needed.
- Check headspace. Measure ½ inch of space between the top of the food and the jar rim. Too little, and the lid won’t seal; too much increases the risk of oxidation and color change.
- Wipe jar rims. Use a clean, damp cloth to wipe every rim before lidding. A small smear of tomato on the sealing surface is enough to prevent a proper seal.
- Apply lids and bands. Center the lid on the jar and screw the band on until fingertip tight and snug, not cranked down. Over-tightening prevents proper venting during processing and can actually cause seal failures.
- Load the canner. Use your jar lifter to lower filled jars onto the rack. Leave a little space between jars so water can circulate freely.
- Process. Ensure water covers jars by at least 1 inch. Add boiling water from a kettle if needed. Bring to a full rolling boil, then start your timer. For tomatoes packed in their own juice or with added liquid, 85 minutes for both pints and quarts. For crushed tomatoes, 45 minutes for both pints and quarts. See the altitude adjustment section below if you’re above 1,000 feet.
- Rest in canner. When processing time is complete, turn off the heat, remove the canner lid, and let jars sit undisturbed in the hot water for 5 minutes. This prevents liquid loss from thermal shock.
- Remove and cool. Transfer jars with your jar lifter to a towel-lined counter. Leave 1–2 inches of space between jars and do not tilt, jostle, or press on lids. Let them cool undisturbed for 12–24 hours.
- Check seals. After 24 hours, press the center of each lid. A sealed lid is firm and curves slightly downward; it doesn’t flex or click. Any lid that moves when pressed did not seal.
For more details on the science behind what’s happening during each of these steps, our Water Bath Canning Guide breaks it all down.
Processing Times and Altitude Adjustments
The processing times above apply at altitudes up to 1,000 feet. At higher elevations, water boils at a lower temperature, which means less heat penetration into the jar during processing. You compensate by adding time.
Add to your processing time based on altitude:
- 1,001–3,000 feet: Add 5 minutes
- 3,001–6,000 feet: Add 10 minutes
- 6,001–8,000 feet: Add 15 minutes
- Above 8,000 feet: Add 20 minutes
If you’re unsure of your local elevation, search “[your city] elevation” or look it up on the USGS National Map. Most of the Midwest, South, and East Coast are under 1,000 feet.
What To Do When Something Goes Wrong
Every canner runs into problems eventually. Most issues are harmless and easy to fix next time.
- A lid didn’t seal. Refrigerate the jar and use within a week. Next time, make sure jar rims are wiped clean before lidding, lids are warmed but not boiled, and bands are only fingertip-tight.
- The liquid is cloudy, or there’s white sediment at the bottom. Usually harmless. This is starch and natural tomato solids settling out during cooling. If the cloudiness is paired with an off smell when you open the jar, discard it.
- Tomatoes are floating with liquid pooled at the bottom. Normal for raw-packed tomatoes. The fruit was more porous than expected and released air during processing. Perfectly safe.
- The color is dull or brownish. Some discoloration is normal in heat-processed tomatoes. As long as the seal held and there’s no off smell on opening, the contents are fine. Oxidation is the usual cause, but it doesn’t affect flavor or safety.
- Liquid seeped out during processing. Small amounts of seepage during the boil are common and don’t necessarily mean the jar failed. Wipe the outside clean after removing from the canner and check the seal at 24 hours. If seepage was heavy, check your headspace and band tightness next batch.
- The jar cracked. Discard the contents; don’t try to salvage them. Prevent cracking by always starting with hot jars, using a rack, and never putting cold glass into boiling water.
Sealed, Stored, and Ready When You Need It
A jar of home-canned tomatoes properly sealed and stored in a cool, dark place will hold peak quality for 12–18 months. They remain safe well beyond that, but flavor and texture are best in the first year.
Label every jar with the date and contents before stacking. You’ll thank yourself in January.
When you open a jar, check it before eating. The lid should resist upward pressure, the contents should look and smell right, and there should be no fizzing or spurting when you break the seal. If anything is off, don’t taste it. Discard the jar and the lid without touching the contents.
The first batch is always the one that takes the longest. By your second or third, you’ll have a rhythm, and blanching, packing, and processing will move faster than you expect.
And when you pull a jar off the shelf in the middle of winter and use it in a sauce that tastes like August, you’ll understand exactly why home canning is worth the afternoon.