
People have been drying food since before recorded history. Sun-dried figs, wind-cured meat, rack-dried herbs, etc. The core idea hasn’t changed.
What has changed is that you can now try your hand at dehydrating food at home in your kitchen for under $100 and a few hours of mostly hands-off time.
A food dehydrator removes moisture slowly and evenly, leaving you with shelf-stable food that lasts months or years, depending on what you’re making and how well you store it.
For home gardeners and homesteaders dealing with surplus produce, it’s one of the most practical preservation tools you can own, right alongside a good canning setup.
This guide covers everything a beginner needs: how dehydration actually works, how to choose your first machine, the best foods to start with, the right temperature settings for each food type, and how home dehydrating compares to freeze drying.
How Food Dehydration Works
Dehydration preserves food by removing water, typically 80–95% of it, which eliminates the moisture that bacteria, mold, and yeast need to grow. Less moisture means a dramatically longer shelf life without refrigeration.
The process works by circulating warm, dry air around the food at a consistent temperature over several hours.
Unlike cooking, the goal isn’t to heat the food; it’s to evaporate the moisture gradually, without turning the food to mush or destroying heat-sensitive nutrients any more than necessary.
What Shelf Life To Expect
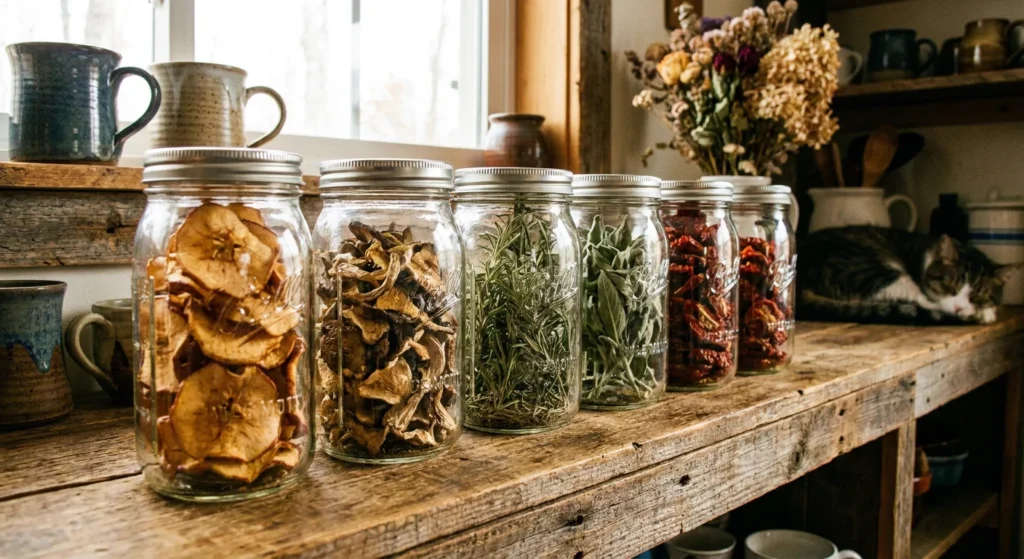
Dehydrated fruits and vegetables stored in airtight containers in a cool, dark location typically last 6–12 months at peak quality and up to 2–5 years before significant degradation.
Dehydrated meat (jerky) should be consumed within 1–2 months at room temperature or up to 6 months vacuum-sealed. Properly dried herbs retain good flavor for 1–3 years.
These aren’t guaranteed figures. Moisture content at drying time, storage conditions, and the specific food all affect shelf life. When in doubt, give it a smell before eating.
Choosing Your First Food Dehydrator
You don’t need to spend a fortune to get started. Most beginners do fine with a machine in the $50–$100 range. There are two main styles to know about.
Stackable Tray Dehydrators
Stackable models are the most affordable option. The heating element sits at the bottom (or top), and you stack circular trays above it. They work well, but airflow is less even from tray to tray, so you’ll need to rotate trays periodically during a long run.
These are good for occasional use, small batches, and anyone not sure how much they’ll actually use a dehydrator. The Nesco and Presto models in this category have solid reputations.
Box-Style (Shelf) Dehydrators
Box or shelf-style dehydrators have a heating element and fan at the back, pushing air horizontally across all trays at once. The result is much more even drying with no rotating required.
They’re easier to load and unload and can handle larger batches. These run $100–$250 and up. If you’re planning to dehydrate regularly or work through a big garden harvest, the extra cost is worth it. Excalibur is the most recognized brand in this category.
Features That Actually Matter
- Adjustable temperature dial or settings: Non-negotiable. Different foods need different temperatures, and a fixed-temp machine severely limits what you can make.
- Multiple trays: More surface area means more food per batch. Most beginner machines come with 5–9 trays.
- Mesh tray inserts: Essential for herbs, small berries, and anything that would fall through standard tray holes. Some machines include these; others sell them separately.
- Timer: Helpful but not essential. You’ll likely be checking on your food anyway.
Don’t pay extra for digital displays or WiFi features when you’re just starting out. Temperature control is the only non-negotiable.
Dehydrating Food at Home: 10 Best Foods To Try
The best starting points for beginners are foods that are widely available, forgiving of small mistakes, and produce results you’ll actually use.
Apples
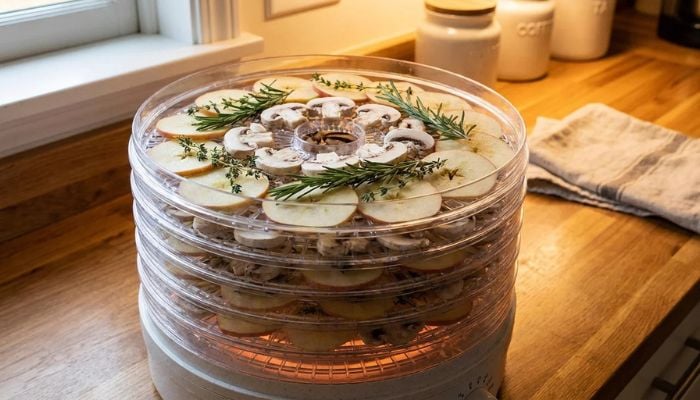
Apples are the classic beginner project. Peel (optional), core, and slice to ¼ inch thick. Dip slices in lemon water for a few minutes to prevent browning. Dry at 135°F for 6–12 hours until pliable and leathery.
The result is chewy, naturally sweet apple chips that last for months in an airtight jar. This is one of the most satisfying first batches you can make.
Mushrooms
Slice to ¼ inch thick and dehydrate at 125°F for 4–8 hours until completely brittle. Dried mushrooms rehydrate beautifully in soups, stews, and pasta sauces, and many home foragers consider homemade dried mushrooms far superior to anything from the store.
Turkey tail mushrooms and oyster mushrooms are both excellent candidates; their firm texture holds up well to drying.
Tomatoes
Halve cherry tomatoes or slice larger varieties to ¼ inch. Dry at 135°F for 6–12 hours. The resulting dried tomatoes are intensely flavored and excellent in sauces, pesto, and pasta.
They’re also one of the best ways to handle a tomato surplus at peak season rather than watching them go soft on the counter.
Fresh Herbs
Herbs are the simplest dehydrating project of all. Set the temperature low (95–115°F) to preserve the volatile oils responsible for flavor and aroma. Most herbs are done in 1–4 hours. Use mesh tray inserts so small leaves don’t fall through.
Basil, oregano, thyme, rosemary, parsley, and dill all dehydrate well. The quality of homegrown dried herbs is noticeably better than what you buy at the grocery store.
Jerky (Beef, Venison, or Turkey)
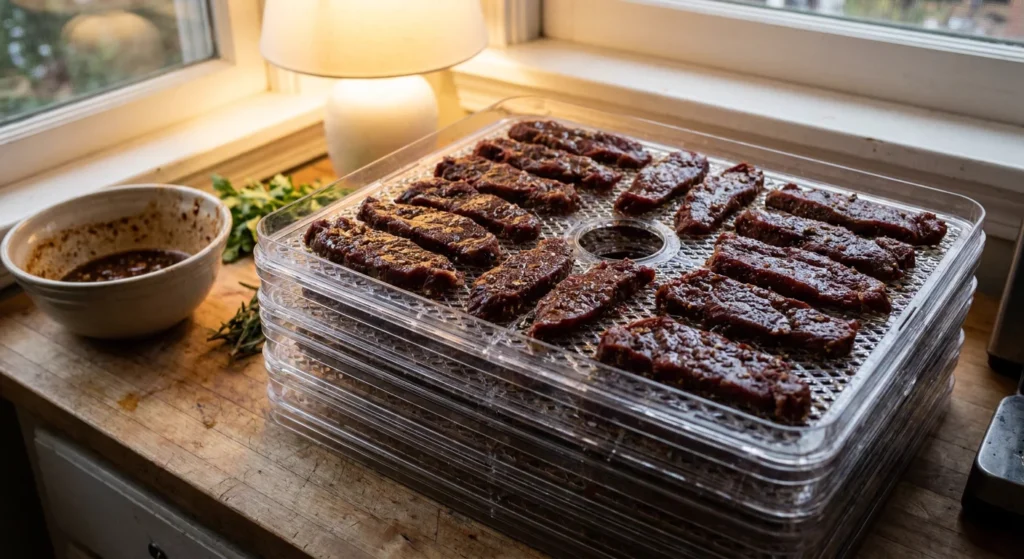
Jerky is the dehydrating project that converts skeptics. Slice meat against the grain to ¼ inch thick; partially frozen meat is much easier to slice evenly. Marinate for 4–24 hours in whatever combination of soy sauce, Worcestershire, spices, and brown sugar appeals to you.
Dehydrate at 160–165°F; this is a hard floor for food safety with meat, not a suggestion. Jerky is done when it bends without breaking and shows no moist spots when you tear a piece.
Bananas
Slice to ¼ inch and dry at 135°F for 6–12 hours. Banana chips are one of the best kid-friendly dehydrating projects. They’re naturally sweet, need no prep beyond slicing, and are practically foolproof. They’re also a practical way to deal with a bunch that’s getting too ripe too fast.
Zucchini
A dehydrator is a gardener’s best friend when zucchini plants are producing faster than anyone can eat them. Slice to ¼ inch and dry at 125–135°F for 6–10 hours.
Zucchini chips are a decent snack on their own. Alternatively, blend fully dried zucchini into a powder and stir it into soups, sauces, or baked goods. This is an easy way to add nutrition without changing the flavor.
Bell Peppers
Dice or slice thin and dry at 125–135°F for 8–12 hours. Rehydrated peppers add color and flavor to soups and stews all winter long. Drying is also one of the more practical solutions for a bumper crop of peppers before they go soft in the crisper drawer.
Citrus Slices
Slice to ⅛ inch thick and dry at 135°F for 6–10 hours. Dried lemon, orange, lime, and grapefruit slices are useful for flavoring teas and drinks, and they make beautiful, long-lasting decorations. This is one of the few dehydrating projects that’s as aesthetically pleasing as it is practical.
Green Beans
Blanch briefly in boiling water, pat dry, and then dehydrate at 125°F for 6–8 hours. Sometimes called “leather britches” in Appalachian cooking tradition, dried green beans rehydrate well in soups and stews.
They’re a classic homestead pantry item and a good use for beans that have gotten a bit long and tough for fresh eating.
Temperature Settings by Food Type
Getting the temperature right is one of the most important variables in dehydrating. Too high, and you’ll case-harden the outside of the food, sealing interior moisture in while the surface looks done. Too low on meat, and you create a food safety risk.
- Fruits: 125–135°F
- Vegetables: 125–135°F
- Herbs and flowers: 95–115°F (low heat preserves the volatile oils that give herbs their flavor)
- Meat and poultry jerky: 160–165°F (USDA minimum; don’t go lower)
- Fish: 145°F minimum
How To Check Doneness
Dehydrating times are always estimates. Actual time varies based on slice thickness, the food’s water content, kitchen humidity, and your specific machine.
Fruits should be pliable and leathery with no moisture when squeezed. Vegetables should be brittle and snap cleanly when bent. Jerky should bend without snapping and show no moist areas when torn.
If you’re uncertain, keep going; overdrying is rarely a problem, but underdrying can cause mold in storage.
Dehydrating vs. Freeze Drying: What’s the Difference?
Both methods preserve food by removing moisture, but that’s where the similarity ends.
Dehydrating uses heat and airflow to evaporate most of the water from food. The result is shelf-stable for months to a few years. Fruits become chewy, vegetables become crisp, and herbs become brittle. Equipment costs $50–$250. Running costs are low.
Freeze-drying freezes food solid and then removes moisture through sublimation in a vacuum chamber, pulling out nearly all the water, including what’s locked in cellular structure, without applying heat.
The result is food that retains close to 97% of its original nutrients, holds its shape, rehydrates to near-fresh texture, and lasts 20–30 years when properly sealed. The quality difference is real and significant.
The catch is that home freeze-dryers cost $3,000–$5,000 and require 24–48 hours per batch. They’re a serious investment for serious preppers, long-term food storage advocates, or families that go through a lot of homegrown produce.
For most beginners, dehydrating is the obvious starting point. It handles the vast majority of home preservation goals, such as surplus garden produce, homemade jerky, dried herbs, trail mix, and backpacking food, without the cost or complexity of freeze-drying.
If you find yourself wanting longer shelf life or better nutrient retention after a few years of dehydrating, a freeze-dryer makes more sense as an upgrade than a starting point.
Stock Your Pantry One Tray at a Time
The learning curve for dehydrating is genuinely short. Slice evenly, set the right temperature, and wait; that’s most of it.
The part that takes time is figuring out which dried foods your household actually reaches for and how to work dehydrating into your regular food preservation rhythm.
Start simple with apples, herbs, or mushrooms. All three are forgiving, are inexpensive, and give you results you’ll use. Once you’re comfortable reading doneness and timing your batches, move to jerky, vegetables, and whatever the garden is producing faster than you can eat it fresh.
Dehydrating works well alongside other preservation methods.
If you’re already putting up tomatoes through water bath canning or preserving low-acid vegetables with pressure canning, a dehydrator rounds out your pantry options and gives you more flexibility for different types of produce.
The more preservation methods you have in your toolkit, the more of your garden actually ends up on the table rather than in the compost pile.