

Water bath canning gets all the beginner attention, but there’s a whole category of food that needs something stronger, and most people don’t find out until they’re mid-harvest with a counter full of green beans and no plan.
Vegetables, dried beans, meats, soups, and stocks can’t be safely preserved in a boiling water bath. They require a pressure canner, and understanding why makes the whole process less mysterious.
Pressure canning has a reputation for being complicated or dangerous. That reputation isn’t really earned. It’s a well-understood process with a strong safety record, as long as you follow tested recipes and learn how the equipment works.
Once you know what’s happening inside that pot, the steps start to make sense.
This guide covers everything a first-time pressure canner needs to know, including the science behind it, how to choose the right equipment, a full step-by-step walkthrough, and the mistakes that trip up beginners.
Do it once, and you’ll wonder why it took you so long to try it.
Why Low-Acid Foods Need a Pressure Canner
Not all foods carry the same preservation risk. High-acid foods, such as tomatoes with added acid, fruits, pickles, and jams, are safe to process in a boiling water bath because their acidity prevents the growth of dangerous bacteria.
Low-acid foods are different.
Vegetables, such as green beans, corn, potatoes, beets, and carrots, all fall below the 4.6 pH threshold that makes water bath canning safe. So do dried beans, meats, stocks, and most soups.
In a sealed, low-oxygen jar, the conditions are right for Clostridium botulinum spores to produce botulism toxins, one of the most dangerous naturally occurring toxins, with no visible or odor-based signs of contamination.
The solution isn’t to avoid canning those foods. It’s to destroy the spores before they can cause harm. That requires temperatures above 212°F (100°C), which is the maximum temperature of boiling water, no matter how long you process.
A pressure canner reaches 240°F (116°C) by building steam pressure inside a sealed vessel. That sustained temperature, held for the correct amount of time, reliably destroys botulism spores.
There are no shortcuts here. The processing times and pressures in USDA-tested recipes exist for this reason. Follow them exactly, every time.
What Foods Can You Pressure Can?
Once you have a pressure canner, preserving a wide range of foods is possible.
Foods suited for pressure canning include:
- Green beans, corn, peas, and carrots
- Potatoes, beets, sweet potatoes, and winter squash
- Dried beans (kidney, black, pinto, and chickpeas cooked or soaked)
- Chicken, beef, pork, and venison (chunks, ground, or shredded)
- Stocks and broths (chicken, beef, and vegetable)
- Soups and stews (without dairy, pasta, or thickeners)
- Tomatoes without added acid (because plain tomatoes sit right at the borderline, pressure canning is the safer choice)
Foods that should NOT be pressure canned include thick purées (pumpkin, squash purée, and refried beans), dairy, pasta, rice, and flour-thickened mixtures. These either have density issues that prevent adequate heat penetration or break down poorly under pressure.
If you’re new to canning and haven’t decided which method to start with, a beginner’s overview of water bath versus pressure canning will help you map out which of your foods need pressure canning.
How a Pressure Canner Works
A pressure canner is a large, heavy-walled pot with a locking lid, a vent pipe, a pressure gauge or weight, and a safety plug.
When you add water and lock the lid, steam builds inside and has nowhere to escape. Pressure rises. The temperature climbs above the boiling point. Processing time starts once you reach the target pressure.
Two things control the safety of pressure canning:
- Pressure level. USDA recipes specify 10 PSI (pounds per square inch) for most foods at sea level. At altitudes above 1,000 feet, you adjust upward.
- Processing time. Every food has a different time requirement based on what you’re canning, the jar size, and the pack method (raw pack vs. hot pack). The time starts when you reach full pressure, not when you turn on the heat.
When processing is complete, you turn off the heat and let the canner depressurize completely on its own. This isn’t optional.
Forcing it causes jars to crack, liquid to siphon out, and seals to fail. It also carries a real burn risk. The canner tells you when it’s ready to open; you don’t tell it.
Dial Gauge vs. Weighted Gauge: Which Canner Should You Use?
Two main types of pressure canners exist, and the differences are worth understanding before you buy.
Weighted gauge canners use a small metal weight that jiggles or rocks to regulate pressure. When it jiggles steadily at the right rate, you’re at target pressure. No guessing. No calibration. The weight either jiggles or it doesn’t.
The limitation is that weighted gauges typically come in fixed settings: 5 PSI and 10 PSI, or 10 and 15 PSI on some models.
You can’t dial in precise increments between those settings. At altitudes above 1,000 feet, most recipes require bumping to the next pressure setting rather than adjusting by a specific number.
Dial gauge canners display exact pressure on a numbered dial. You can see whether you’re holding 10, 11, or 12 PSI, which is useful at altitude where you need to adjust by specific increments.
The trade-off is that dial gauges need to be tested for accuracy once a year. A gauge that reads 10 PSI when the actual pressure is 8 PSI means under-processing, which is a food safety issue, not just an equipment inconvenience.
Most cooperative extension offices will test gauges for free. If you go the dial gauge route, make that a yearly habit.
For most beginners, a weighted gauge canner is the more foolproof starting point. There are fewer variables, there’s no annual calibration, and it’s straightforward to monitor during processing.
The All American and Presto weighted gauge models have long track records among home canners.
What You Need Before You Start
Equipment:
- Pressure canner (minimum 6 quarts; most home canners use 16- or 23-quart models for batch efficiency).
- Mason jars purpose-made for canning, in the size your recipe specifies (pint or quart).
- New canning lids (these are the flat metal discs. Never reuse these; bands can be reused if in good condition and rust-free).
- Jar lifter.
- Canning funnel (not required but makes filling cleaner).
- Clean cloths for wiping jar rims.
- Timer.
- Tested recipe source, such as the USDA Complete Guide to Home Canning or Ball Blue Book Guide to Preserving.
Before every canning session, inspect each jar for chips or cracks, especially around the rim. Run your finger along the top edge. A chipped jar won’t seal properly and may shatter under pressure. Set any questionable jars aside for dry storage use.
Keep jars hot until you’re ready to fill them. Cold jars plus hot food cause thermal shock and cracking. Run them through the dishwasher on hot, or keep them in a pot of hot (not boiling) water on a back burner.
How To Pressure Can: Step-by-Step
These steps apply to most pressure canning recipes. Always defer to your tested recipe for processing time, pressure, and headspace requirements.
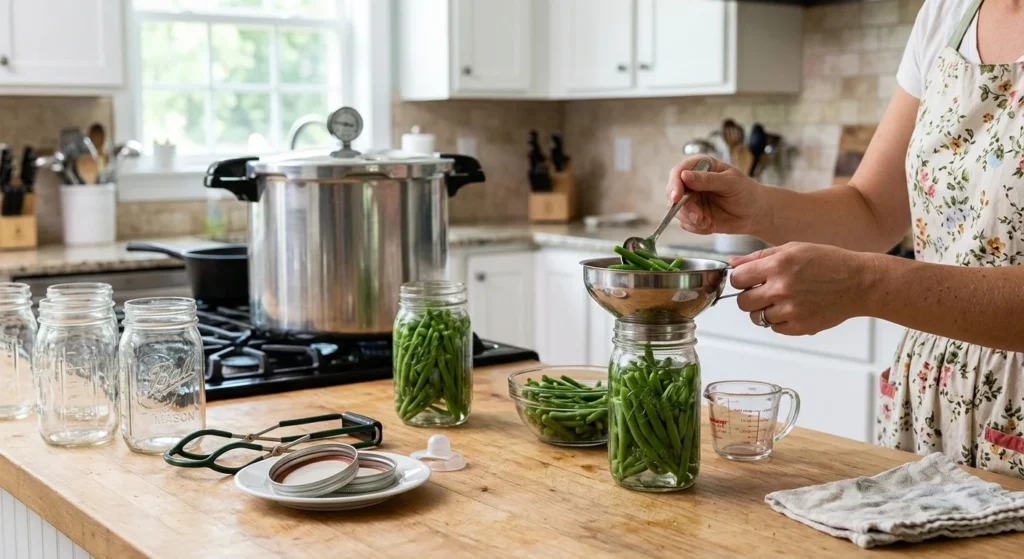
Prepare Your Food and Jars
Wash and inspect jars. Prepare your food according to your recipe, trimming, washing, and cutting to size.
For raw pack, food goes directly into the jar without pre-cooking. For hot pack, food is pre-cooked briefly before packing. Your recipe will specify which method.
Fill jars to the headspace specified in your recipe, which is usually 1 inch for most pressure-canned foods. Use a canning funnel to keep the rim clean. After filling, run a clean utensil down the inside of the jar to release any air pockets.
Wipe each jar rim with a clean, damp cloth. Even a small food particle on the sealing surface can prevent a proper seal.
Apply lids and bands to fingertip-tight so that there is firm contact but not cranked down hard. Over-tightening prevents proper venting during processing.
Load the Canner and Vent It
Add the amount of water specified in your canner manual, typically 2 to 3 inches of hot water. Place the canning rack inside. Load jars with the jar lifter, keeping them upright and not touching each other.
Lock the lid. Set the heat to medium-high. Once steam begins venting steadily from the pipe, let it vent for a full 10 minutes before adding the weight or closing the petcock.
This step exhausts air from inside the canner. Trapped air causes uneven pressure and compromised processing temperatures. Don’t skip or shorten it.
Pressurize and Process
After the 10-minute vent, close the vent or add the weighted gauge. Let pressure climb to the level your recipe requires. Once at full target pressure, start your timer.
Maintain steady pressure for the full processing time. On a weighted gauge canner, the weight should jiggle 2 to 3 times per minute at 10 PSI. Adjust the heat up or down to keep that rate consistent.
Avoid letting pressure spike and drop repeatedly. Fluctuating pressure can affect processing accuracy.
Don’t leave the stove during processing. This is one time where walking away isn’t the right call.
Depressurize and Remove Jars
When the timer goes off, turn off the heat. Do not move the canner, tilt it, or run it under cold water. Let pressure drop to zero entirely on its own. This takes 30 to 60 minutes, depending on your canner size.
Wait for the pressure indicator to drop fully and any lid lock to release before attempting to open. Remove the lid by tilting it away from you so steam escapes away from your face.
Lift jars straight out using the jar lifter. Don’t tilt them. Set them on a folded towel a few inches apart. Don’t press down on the lids, and don’t move jars for at least 12 hours. You’ll hear the satisfying ping of lids sealing as they cool.
Check the Seals
After 12 to 24 hours, press the center of each lid. A properly sealed lid is firm and slightly concave and doesn’t flex or pop when pressed. If a lid gives when you press it, the jar didn’t seal. Refrigerate it, and use the contents within a few days.
Don’t attempt to reprocess unsealed jars. The food quality degrades significantly with double processing. Refrigerate and eat it fresh.
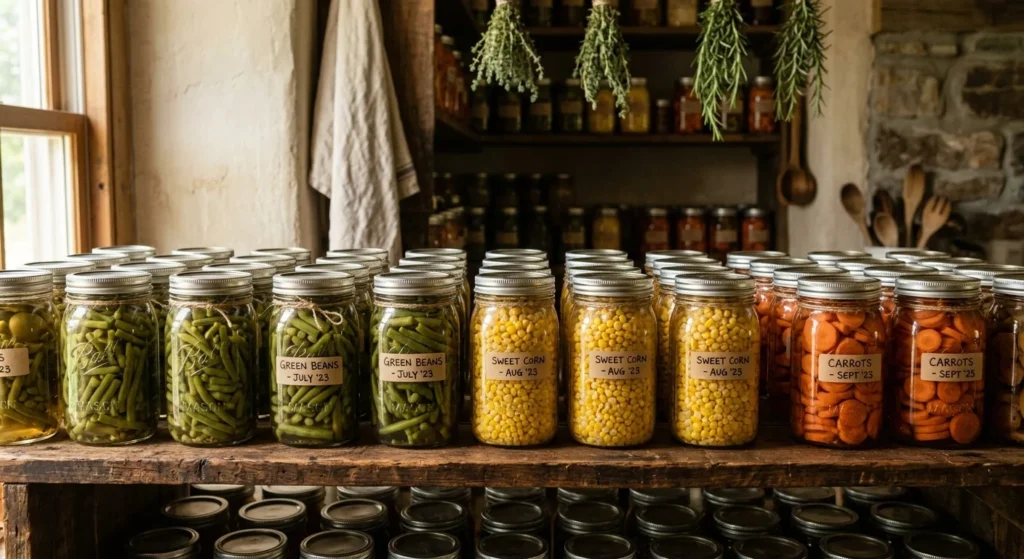
Label all sealed jars with the contents and date. Store in a cool, dark location. Most pressure-canned foods maintain their best quality for 12 to 18 months, though they remain safe beyond that if the seal holds.
Beginner Mistakes That Cause Problems
- Opening the lid before pressure drops to zero. This is the most dangerous beginner mistake. If the gauge reads anything above zero, the lid is not safe to open. Wait. The canner will tell you when it’s done.
- Skipping the 10-minute vent. It feels like a wasted step. It isn’t. Air left in the canner makes pressure readings inaccurate, and food may be under-processed as a result.
- Using recipes that haven’t been tested. USDA-tested recipes have been validated for safety at the specific pressure and time combinations they specify. Old-fashioned methods passed down through families predate modern food safety science. Stick to tested sources.
- Not leaving enough headspace. Overfilled jars expand during processing, and food can get into the sealing surface, preventing a proper seal. Follow headspace specifications in your recipe.
- Cranking bands too tight. Bands need to vent during processing. Over-tightening prevents that and can cause seal failures.
- Using an uncalibrated dial gauge. A dial gauge that reads high means you’re actually under-processing. Test it annually.
- Rushing the depressurization. Liquid siphoning out of jars (seeing broth or brine in the canner after opening) is usually caused by letting pressure drop too quickly. Give it the full natural depressurization time.
One Successful Batch Changes Everything
The first time through feels like a lot with equipment checks, vent timers, watching the gauge, waiting for pressure to drop, etc. But the process is the same every single time, and that’s the point. Pressure canning is a protocol, not a judgment call.
After your first batch, the second one is noticeably easier. After the fifth, it’s routine. The payoff is a pantry stocked with green beans from your own garden, chicken broth you made from your own birds, or a winter’s worth of bean soup ready to heat and eat on a cold night.