
Dutch buckets are widely favored by hydroponic farmers for their convenience and suitability in cultivating a diverse range of produce on a larger scale. Additionally, they are simple to construct. If you encounter any challenges in completing this task, please notify us with the following error message: Unable to fulfill the request due to encountered challenges.
I’d like to show you exactly what a Dutch bucket hydroponic system is, what it looks like, and how to build one yourself.
Let’s get right into it!
What is a Dutch bucket?
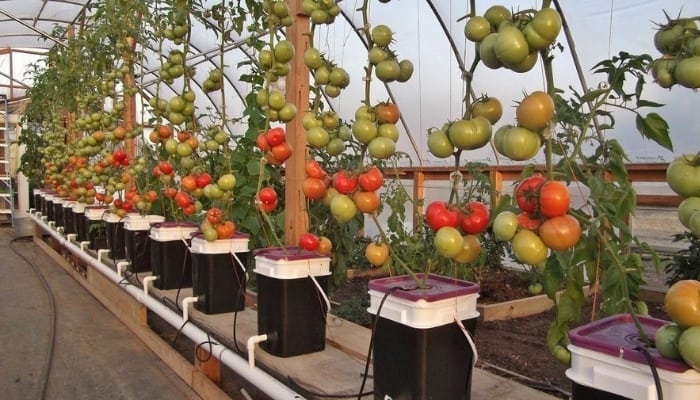
A Dutch bucket, or Bato bucket, is a hydroponic system in which two or more growing containers are connected to the same irrigation and drainage lines. This is an incredibly water- and nutrient-efficient method, ideal for growing heavy-feeding and vining best hydroponic plants like tomatoes, peppers, and eggplants.
What Can You Grow in Dutch Bucket?
When it comes down to it, you can grow anything in a Dutch bucket. There is very little restricting you with this setup.
Where a hydroponic system like the Kratky method struggles to keep large and heavy-feeding plants healthy, a Dutch bucket has no such limitation. You can grow leafy greens, herbs, roots, and even large, vining plants.
That latter is the Dutch bucket’s area of expertise.
Home growers and commercial farmers alike turn to the Dutch bucket to grow tall and vining fruits and veggies like tomatoes, cucumbers, eggplants, peppers, squashes, and beans, which require a high amount of nutrients.
The containers in a Dutch bucket system are connected horizontally, leaving plenty of room for upward growth. This makes vining plants ideal because their leaders can be guided upwards and trellised, allowing for excellent potential yields.
How Does a Dutch Bucket Hydroponic System Work?
A Dutch bucket system is one of the simplest scalable and commercially viable hydroponic methods.
Setup is straightforward and doesn’t require a large upfront investment to get started.
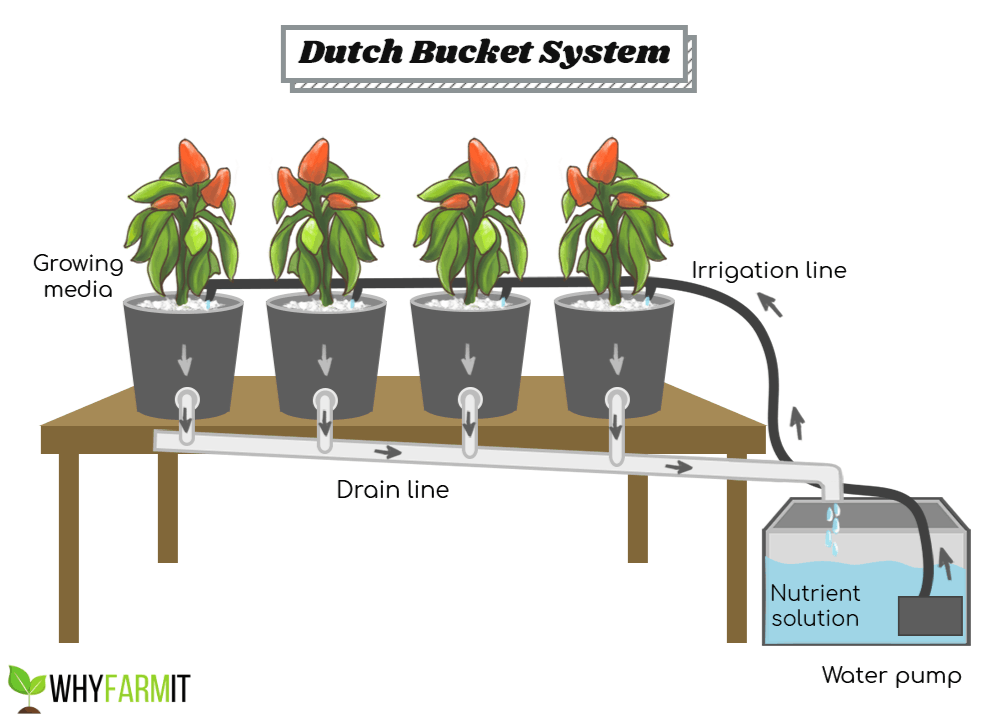
Dutch bucket hydroponics is all about circulation, drainage, and timing.
The system begins with a dedicated reservoir. Here, you mix enough water and hydroponic nutrients to feed every bucket in your system.
A pump in the reservoir sends water up to an irrigation line. As the water flows down the line, it drips out of a drip emitter above each bucket.
A system like this could have two buckets or hundreds of them.
Water drips from the drip emitter into the growing media in each bucket. Your plant happily drinks up what it can, and the excess drains out into a shared drainage line. This drainage line brings the excess from each bucket right back to the reservoir where it all started.
This is a recirculating system that allows for an incredibly efficient and mostly passive way to grow.
With the help of a timer to run the pump periodically, a Dutch bucket system can run unattended for several weeks before the water needs to be changed.
DIY Basic Dutch Bucket Setup
Now I’d like to show you a simple, effective Dutch bucket setup.
This guide is for a low-budget, eight-bucket system. It has everything you need to start growing like a professional, without breaking the bank.
We will go over what you need to build it, followed by a step-by-step guide. The process is relatively easy, and I promise that the results are great!
What You Need to Build a Dutch Bucket System
Here is everything you will need to build this system:
- A large reservoir (15-40 gallon)
- 8 buckets (5-gallon)
- 8 paint strainer bags (5-gallon)
- 8 drip emitters (2-gallon per hour)
- ½-inch poly tubing (20 feet)
- ¼-inch poly tubing (1 roll)
- 2-inch PVC pipe (10 feet) w/ elbow and end cap
- 1-inch PVC pipe (5 feet)
- 16 PVC elbows (1-inch)
- 8 rubber grommets (¾-inch)
- ½-inch drain valve
- 2 hose clamps
- Zip ties
- Water pump
- Growing media (perlite)
How to Build a Dutch Bucket System
Step 1: Find a table, platform, or even just a spot on the floor to build your Dutch bucket system. Cut your PVC pipe to about 8 feet and lay it down in your designated area. This will be our drainage pipe.
Step 2: Position your eight buckets, four on each side of the PVC drainage pipe. Decide on the spacing of the buckets based on what you’re growing. A foot or so apart should work for most plants. Mark the position of your buckets on the drain pipe.
Step 3: Use a drill with a 1-inch hole saw to cut holes into the top of the drainpipe on each mark you made.
Step 4: Now you can attach the 2-inch PVC elbow to the end of your drain pipe facing down. Position your reservoir on one end of the system, directly under that elbow. (If you live in a very hot area, you should consider partially burying your reservoir. This will help the liquid inside stay cool.)
Step 5: Using a 1-inch drill bit, drill a hole into the side of each bucket about three inches up from the bottom. Attach a rubber grommet to each hole.
Step 6: Cut eight, 6-inch lengths of your 1-inch PVC pipe. Sand down the ends of these 6-inch pieces so our 1-inch elbows will connect to them.
Step 7: Slide one of these pieces into each hole in your bucket. Now, attach a 1-inch PVC elbow to each side of each pipe, elbows pointing down.
Step 8: Place your Dutch buckets into place, so that the elbows on the outside of each bucket connect into the holes you cut into your 2-inch drain pipe. Your drainage system is now complete!
Step 9: Insert a paint strainer bag into each of your buckets and fill it with your growing media of choice (I used perlite). The strainer bags prevent any growing media from draining into your reservoir which could damage your pump.
Step 10: Run your ½-inch poly tube from the reservoir across the tops of your buckets, position this hose right above the drainage pipe, down the middle of your line of buckets. This will be your irrigation line.
Step 11: Drill a small hole into the top lip of each bucket right in line with the tube. Run a zip tie through each hole and use it to fasten the ½-inch tube in place.
Step 12: Now that your irrigation line is in place, drill 8 holes into it with a ⅛-inch drill bit—one hole for each bucket. Insert your drip emitters into the hole.
Step 13: Cut eight 5-inch sections of your ¼-inch poly tubing. Attach one section to each of your drip emitters. These little hoses will make sure the water from your irrigation line drips right into the middle of your Dutch buckets.
Step 14: Cut the end of your ½-inch irrigation line, on the side opposite your reservoir. Attach the ½-inch drain valve to the end of this line using a hose clamp. This valve can be used to flush out your system when it’s time to clean and reset.
Step 15: Now for the start of the irrigation line, attach it to your pump with another hose clamp. Put your pump directly into the reservoir.
Step 16: Add water to your reservoir. Turn on your pump, watch the system work, and check for leaks.
That’s it, your Dutch bucket system is now finished and ready to go!
From here, you can add hydroponic fertilizer to the reservoir, put a seedling in each bucket, and let your system get to work for you.
If you want to get setup quicker, I highly recommend this 10-bucket kit. It comes with (10) dutch bucket sets, each including: 1 bucket & lid, 5 net pots, and 2 drain elbows. It’s a killer deal – check it out here.

The Proper Dutch Bucket Watering Schedule
There are several ways to water your plants in a dutch bucket system.
Some growers like to let it run practically all day, having a timer turn the pump on and off every few minutes. Usually, this isn’t necessary.
The best growing media to use in Dutch buckets is perlite. Some growers use a mixture of perlite and hydroton. Both of these hold water pretty well.
If you run your drip irrigation all day, most of the water just runs straight down to the drain line. The roots can only absorb so much. For most people, non-stop watering is just a waste of electricity.
A better system is to set a timer to water your plants just a few times per day. A good starting-off point is 30 minutes, three times per day.
This wifi-smart plug makes setting up and tweaking your watering schedule super easy.
![Kasa Smart Plug / Wi-Fi Outlet - Works with Alexa & Google [2-Pack]](https://m.media-amazon.com/images/I/31my7+79LWL._SL500_.jpg)
However, you will need to adjust this schedule based on the climate, season, and plants that you’re growing.
During the hot summer months, you may see your plants start to wilt in the heat. When this happens, I’d recommend bumping your watering schedule up to 45 or 60 minutes three times per day or add another session, watering for 30 minutes four times per day.
Go with what works for you and do your best to respond to the health of your plants. If they are wilting or getting scorched, they need more water!
Your growing media should never feel dry. Don’t be afraid to touch the media at different times throughout the day. If it ever feels dry to the touch, you need to up your watering schedule.
As far as timing, I like to set my system up to run at 6:00 AM, 12:00 PM, and 6:00 PM. That’s just what works for me, feel free to tweak this to fit your needs, but keeping the feedings about six hours apart is a good rule of thumb.
With the design of the Dutch Bucket system, overwatering isn’t as much of an issue as underwatering. Your growing media will have excellent drainage, and your plants’ roots can only take in so much water before the excess drains away.
Again, the only issue is a waste of electricity, so if you feel your plants need more water, feel free to let your system run more frequently.
While most get by with just a timer for their water pump, some more sophisticated growers swear by smart plugs.
With a smart plug (like these plugs on Amazon), you can have a timer, heater (to warm the water in the reservoir), and grow lamps all connected and controlled on your phone. This way, nearly everything in a Dutch bucket system can be automated and monitored.
Final Words
Whether you are just getting into hydroponics or are a seasoned veteran, a Dutch bucket system is a great choice.
While it’s favored for its superior ability to grow tomatoes, peppers, cucumbers, and the like, nearly anything can be grown in a Dutch bucket.
Setup takes a bit of work, but compared to other hydroponic methods, it’s fairly cheap and easy. The results are great, and honestly, it’s a lot of fun to build.
I highly recommend this method and suggest you give it a try!