
The Kratky Method is an approach utilized for cultivating plants in a hydroponic setting.
Developed by horticulturist Bernard A. Kratky of the University of Hawaii at Manoa, the Kratky Method is by far the simplest and easiest hydroponic method.
For folks just getting into hydroponics and those of us who want delicious, fresh vegetables without breaking a sweat, the Kratky Method is hands-down the best hydroponic system to choose.
This is because there are no pumps, bubblers, wicks, or timers required. A Kratky hydroponic system requires no electricity and very little effort and money to build.
Best of all, it’s a passive method—you just set it and forget it.
How Does The Kratky Method Work?
The Kratky method is very similar to deep water culture hydroponics. However, where Deep Water Culture requires an air pump, air stone, and tubing, the Kratky method does not.
Here’s how Kratky works:
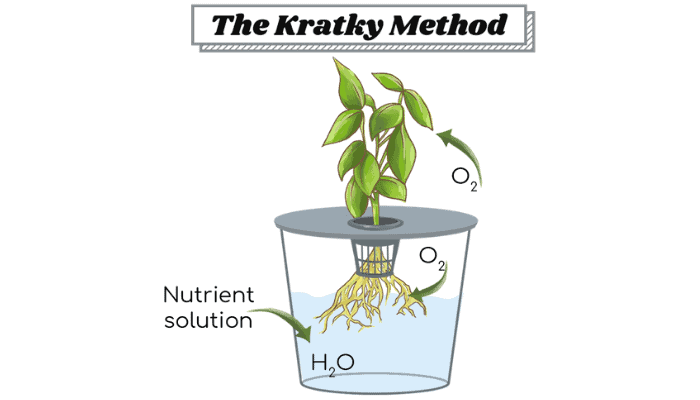
A reservoir, usually a simple plastic container, is filled with a mixture of water and hydroponic nutrients. A lid sits atop the reservoir. Between the surface of the water and the lid is a gap of air.
Seedlings of your favorite fruit or vegetable are placed into a hydroponic growing medium inside a net cup. The net cup is placed in a hole on the lid so just the bottom of the cup is touching the liquid inside.
From there, nature takes over, and the brilliance of the Kratky method becomes clear.
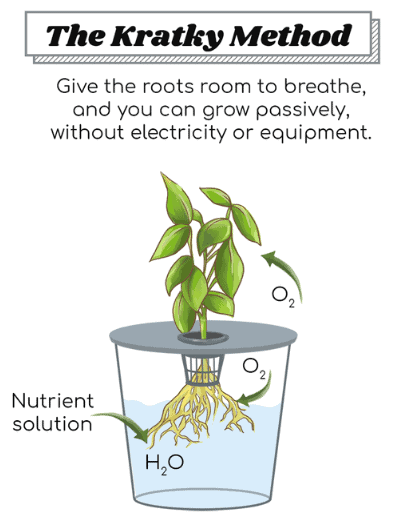
The growing medium absorbs the nutrient-rich water which is fed to the seedling. The seedling naturally shoots its roots down into the solution, eager for more nourishment.
Because the cup is only touching the water, not submerged in it, the top of the root system is still able to get all of the oxygen it needs.
That’s right—not only the leaves need oxygen, the roots need it too.
In a system like deep water culture, the entire net cup (and all of the root system) is submerged in liquid, meaning the root system can’t get enough oxygen. This is why an air stone and air pump are required. An air stone pumps air bubbles into the water, increasing the amount of oxygen available to the plant.
Now, back to Kratky…
By leaving that gap of air above the water, our plants grow healthy roots and get all of the oxygen they need.
As the plant drinks more water and nutrients, the water level goes down, and the roots grow down with it.
By measuring the correct amount of water from the start, no refilling or circulation is necessary.
This simple, yet effective strategy is what makes Kratky the only real passive, unplugged system.
What Can You Grow With the Kratky Method?
Almost anything can be grown in a Kratky setup, but some plants work better than others.
And in my experience, even some of the more difficult Kratky crops grow well in the hands of crafty growers.
At the end of the day, as long as you have the right amount of liquid with the right nutrients, most vegetables can be grown with the Kratky method.
What Grows Best With the Kratky Method?
In general, small plants with short growth cycles work best. The best place to start is with leafy greens.
Here are some plants that are famously easy to grow with the Kratky method:
- Kale
- Spinach
- Any type of lettuce
- Bok Choy
- Collard greens
And the list goes on and on, there are many plants well-suited for Kratky hydroponics.
Broccoli is another great Kratky project. While it needs more water and grows more slowly than other brassicas like kale and collard greens, you can get some great yields of broccoli in a super simple Kratky system.
Along with leafy greens, another class of vegetables works exceedingly well with Kratky—and that’s herbs.
What Herbs Grow Best With Kratky?
Most herbs don’t require much water and grow super fast, making them perfect to use in your Kratky system.
Some of the easiest herbs to grow with the Kratky method are:
- Basil
- Chives
- Dill
- Cilantro
- Endive
- Sage
Grow tip: Just like with some of your leafy greens, you can harvest your herbs periodically, picking the mature outer leaves first, and they will just keep growing and growing.
You’d be surprised at how much basil you can get just out of a simple mason jar build, let alone a 5-gallon tote!
What Doesn’t Grow Well With the Kratky Method?
Something you and your good old friend Kratky may struggle with, are large and long plants, as well as some root vegetables.
The first issue with large plants and heavy-drinkers—for example, tomatoes—is simply that they need larger containers.
Where baby spinach can easily be grown in a mason jar full of nutrient solution, a full-size tomato plant will need a much larger tank.
As a rule of thumb, the larger the plant, and the thicker the stems, the more water it needs.
Can You Grow Tomatoes With the Kratky Method?
As you can imagine, if you get a couple of tomato plants going, Kratky-style, in your basement, you will quickly find yourself running out of space.
But hey, if you have room for it, the sky’s the limit.
Tomatoes do well with the Kratky system. But, you will need to be more careful when it comes to nutrient levels, pH, and temperature.
And for those of you who had your hearts set on luscious, juicy tomatoes but don’t have loads of time or growing real estate, I’ve got you covered…
Many small tomato plants are perfect for indoor growth!
“Tiny Tim” and “506 Bush” are great varieties, both just around 18 inches tall. They don’t consume as much water as larger tomato plants and can fit on your countertop or windowsill.
Can You Grow Cucumbers With the Kratky Method?
Cucumber plants run into many of the same problems that tomatoes do. Cucumbers are large plants that need large volumes of water.
So, if you want to “set it and forget it”, Kratky style, you need to get yourself a large container and be meticulous in your measurements.
Also, just like some varieties of tomato, cucumbers grow best when trellised.
Trellising is just a way to help your plant grow by weaving or tying it to a vertical support. Without this support, you won’t get very impressive yields on your cucumbers.
Simple solution, get yourself some cheap trellis netting online or you can even build your own out of wood.
Can You Grow Root Vegetables With the Kratky Method?
Now, the other troublesome group would be root veggies. With a Kratky system, you usually have leaves, flowers, or fruits above the lid, and simple roots below.
But, with something like a potato, the goods are down below inside the reservoir.
Instead of a nice beard of dangling roots hanging into the water, you will have a network of dangling tubers (potatoes) and roots all doing their thing inside your tank.
You can certainly attempt potatoes in a Kratky system—many growers have had success with them. But, for beginners, you may end up some root rot from all of the moisture, or even a tater or two at the bottom of your bucket!
Can You Grow Carrots With the Kratky Method?
On the other hand, root veggies like carrots can be quite successful with the Kratky method.
But, because of the plant’s biology, you won’t want to grow them in your net cups. If you put a carrot seedling into a root cup, as it grows, it will bend and eventually break your cups.
Save your cups, and try this instead:
Step 1: Take a cube of rockwool and cut a small lip on the top. The lip will allow you to fit the rockwool directly into some holes on the top of your container, eliminating the need for net cups.
Step 2: Put the carrot seeds directly into the rock wool. Allow the bottom of your rock wool cubes to touch the top of the water.
Step 3: After about a week, your carrots will sprout. At this point, you can add your nutrient mixture to the water and continue on as you would any other Kratky grow.
Just make sure that only the roots are touching the water—your ever-expanding carrots should dangle above the surface of the liquid, not be submerged.
Can You Grow Garlic and Onions With the Kratky Method?
Yes. Garlic and onions are root vegetables but don’t have the same issues as potatoes. They work great with the Kratky method.
Green onions, or scallions, are very productive and beginner-friendly. The bulbs of green onions are so small that they fit right inside your net cups, unlike regular onions.
You can even take green onions you bought from the store, cut off the tops and cook with them, and put the leftover bulbs right into your Kratky setup. Just get them hydrated in some grow medium, and the roots will stretch down into the water.
Once you start growing scallions, you can very easily develop a system and grow them forever!
This process is the same for garlic.
Take a clove of garlic and put it into a net cup with the pointy side up and the root side down. Insert the cup into your reservoir so it touches the bottom of the cup. Then, sit back and relax while nature does the rest.
Can You Grow Strawberries With the Kratky Method?
Yes, strawberries grow well in a Kratky system.
The plant does need a good amount of water, so you will need a much larger container than what you would use to grow, let’s say, spinach.
The best thing about doing strawberries with the Kratky method is that you can quickly get many plants growing by rooting the runners.
In nature, a strawberry plant grows to a certain size before it sends off runners. These runners are like branches that grow horizontally away from the plant.
Runners touch down into the soil and set root, growing into another strawberry plant.
That’s right, one strawberry plant can quickly become dozens under the right conditions!
As hydroponic growers, we can take those runners and plant them directly into a new container. Once you get some roots coming out of your runner, you can clip it off of the original and it will grow just like any other strawberry plant.
Setting Up A Kratky Hydroponics System
The best thing about the Kratky system is just how easy it is to set up.
Tubes? Filters? Timers? No, no, and no.
I bet you have the beginnings of a Kratky system in your home right now.
Equipment You Will Need For Your Kratky Hydroponic System:
- Some kind of reservoir – This is the container that will hold the water and nutrient mix.
- A lid – Your plant will sit in a hole on the lid. The lid also blocks light from the nutrient solution, keeps pests away from the roots, and slows the evaporation of the liquid.
- Net cups – These are plastic cups for holding your seedlings. They have holes in the bottom that the roots of the plant can grow through.
- Growing medium – Your seeds and seedlings need a substrate from which to grow. Instead of soil, in hydroponics, we use rockwool, coconut fiber (aka coconut coir), perlite, or hydroton to support the plant, hold air and moisture, and block light from hitting the roots.
- Hydroponic fertilizer – Instead of pulling nutrition from the soil, hydroponic plants get it from the water. You will need to combine liquid or solid nutrient mixes with your water to feed your plants.
- Water – Plants need water to survive! As mentioned before, water is how we deliver nutrients to the plant via the roots.
- Seeds or seedlings – You can put seeds directly into a Kratky system or “start” the seeds, allowing them to germinate into seedlings before putting them in (I get my seeds here).
- (Optional) pH Control – You can find inexpensive home pH testing kits to make sure your water has the right pH for your plants and solutions to tweak the pH to get it back on track.
That’s all it takes to get started.
You don’t need to go out and buy anything crazy or make a large investment to grow great fruits and veggies. For this reason, the Kratky method is the perfect entry point for any blossoming hydroponic enthusiasts.
You can get your toes in the water with Kratky, see if you like it, and then go from there.
How To Build a Kratky Hydroponic System
Here is a step-by-step guide on how to build a simple Kratky hydroponic system, perfect for growing leafy greens and herbs.
Step 1: Get yourself a container to hold your water and nutrient solution. For a single plant, use a mason jar. (If you would like to grow many plants at the same time, I’d recommend a grow-safe plastic tote.)
Step 2: Drill or cut a hole in the lid of your container large enough to fit a 2-inch net cup.
Step 3: Get your net cup ready. Soak a hunk of rockwool in water and place it in the net cup. Put your lettuce seeds into the hole in the rockwool.
Step 4: Next, place your net cup into the hole in your container. Fill the container with clean water until the water touches the bottom of the net cup.
Step 5: Once the lettuce seeds begin to sprout in a few days, add your nutrients to the water.
That’s all it takes.
From this point on, your plant does the rest of the work for you.
If you are growing in a tote, make several holes in the lid, leaving enough space between them for your plants to grow. From there, just repeat the steps and put a seeded net cup in each hole.
With very little effort, you have yourself a passive garden.
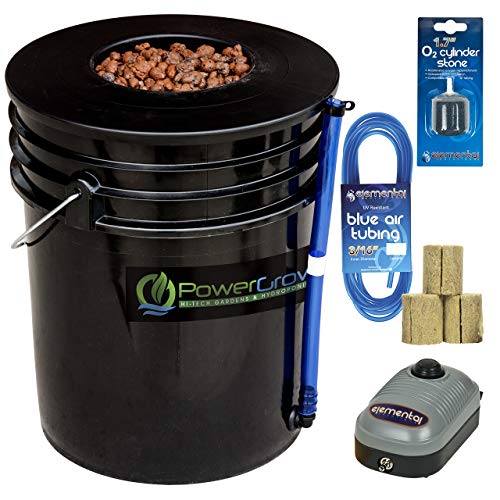
Not up for building your own Kratky System?
I’d recommend picking up this premade system on Amazon.
Grow tip: Be careful mixing types of plants into a single Kratky system! Imagine that you put a slow-and-steady drinker like butterhead lettuce into the same container as a thirstier, more competitive plant, like bok choy. Your bok choy will outpace your butterhead, leaving behind an insufficient amount of water and nutrients. The result will be big healthy bok choy and stunted little heads of lettuce. The solution? Dedicate one container to one plant type, or at least plants of a certain type that have similar root masses.
Types of Kratky Setups
Kratky is flexible. There are many options for your setup, scaling from the incredibly simple windowsill basil plant, all the way up to a commercial grow operation.
Because these “systems” are so simple, it mostly comes down to what container you choose.
Here are some of the most popular solutions:
- Mason jar (pints and quarts)
- Plastic totes (5-gallon, 10-gallon, 20-gallon)
- Plastic barrels and buckets (5-gallon)
- Wooden boxes lined with plastic
While they are very similar, floating raft setups aren’t for the Krafty method. Floating rafts sit directly on the top of the water whereas Kratky setups need a gap of air between the lid and the water.
Grow tip: If you are going to DIY your Kratky reservoir, make sure you cover or paint them to block out as much light as possible. You can wrap them in paper, tin foil, or tape, or paint them black.If too much light gets inside your reservoir, algae will begin to grow and eat up your valuable nutrients.
Can You Refill Your Kratky Reservoir?
Yes, if you notice that your plant’s roots aren’t touching the water, there is no harm in refilling your Kratky reservoir.
However, you should rarely, if ever, have to do this. The whole point of the Kratky method is that it’s passive, meaning you don’t need to do anything to the system once you start it.
If you measure the correct amount of liquid the first time, you will never need to refill your reservoir. The roots will grow down at about the same rate that the water level goes down.
What Nutrients Are Used In the Kratky Method?
Just like when grown in soil or any other hydroponic system, plants need specific nutrients and minerals to survive.
You will need to combine fertilizer with water inside of your Kratky reservoir to keep your plants healthy and productive.
The most essential nutrients for any plant are nitrogen (N), phosphorus (P), and potassium (K). Your plants need these three, known as NPK, above all else.
Other important nutrients are calcium, magnesium, and sulfur.
Lastly, to a lesser degree, plants need trace elements like iron, manganese, zinc, copper, boron, and molybdenum.
Hydroponic fertilizers will contain all of these important nutrients. The simplest way to supply these nutrients to your plants is through a high-quality liquid nutrient mix.
You can just follow the instructions on the back of the bottle and stir it into your water for a perfect balance of nutrients.
Kratky Method Pros and Cons
There’s no hiding it, the Kratky method is one of my favorite hydroponic methods.
It’s great at what it does, but it can’t do everything.
Let’s see, once and for all, what the Kratky method is great for, and what it isn’t.
Kratky Method Pros
Setup is so easy. This method requires the least investment, equipment, and technical knowledge of any other hydroponic method.
It’s a beginner-friendly method. Before you go out and buy an expensive system with timers, regulators, grow lights, and more, you can test out hydroponics with the Kratky method. In my opinion, there is no better way to grow your first hydroponic plant than with Kratky.
It’s a truly passive system. Once you get everything set up, you don’t need to touch it again until it’s time to harvest. Growing this way is hassle-free and stress-free.
Plants grow fast and have great yields. Believe it or not, studies have shown that the Kratky method yields are as good as ones from any other method. You aren’t sacrificing any delicious veggies for the simplicity of the method. Also, compared to plants grown in soil, plants grown in hydroponic systems grow much faster.
Kratky Method Cons
It isn’t suitable for all types of plants. The Kratky method works best for things like leafy greens and herbs. Large, long plants and ones that live long lives aren’t the best to grow with this method. It’s not ideal at larger scales.
For home growing or even commercial growing at a very small scale, Kratky is great. However, serious commercial growers tend to choose more complex and sophisticated methods for their businesses. Other hydroponic methods are just more controllable and easier to scale.
