
Growing your own garlic is one of the most rewarding things you can do in a kitchen garden. It takes up almost no space, needs minimal attention once it’s in the ground, and produces something you’ll actually use every single week.
The catch is that most of the work happens in the fall, months before you’ll ever see a harvest.
This guide covers everything you need to know about how to grow garlic from cloves through a full season, including choosing the right variety for your climate, planting at the right time and depth, mulching for winter, spring care, and knowing when it’s finally time to pull.
Whether you’re planting your first bed or trying to get a bigger harvest than last year, here’s how to do it right.
Why Grow Garlic From Cloves (Not Seed)
Garlic doesn’t reproduce the way most vegetables do. True garlic seed exists but is rarely used by home gardeners because it takes years to develop full bulbs and requires specialized techniques.
Instead, garlic is propagated vegetatively: you plant a single clove, and it grows into a full bulb.
This means the cloves you plant are genetically identical to the bulb they came from. If you save your best, largest cloves at harvest and replant them in the fall, your garlic will actually improve over time as it adapts to your specific soil and climate.
It’s one of those crops that rewards patience and repetition.
Hardneck vs. Softneck: Choosing Your Variety
Before you order seed garlic or head to the farmers market, you need to know which type of garlic makes sense for where you live.
Hardneck Garlic
Hardneck varieties (Allium sativum var. ophioscorodon) have a stiff central stalk that runs through the bulb. They perform best in USDA Zones 4–7, i.e., areas with cold winters that give the garlic a proper dormancy period.
Hardnecks tend to have more complex, nuanced flavor and fewer but larger cloves per bulb.
A major bonus is that hardneck garlic produces scapes in early summer. These are the curling flower stalks you’ve probably seen at farmers’ markets. Cut them off to redirect energy into the bulb, and use them in stir fries, pestos, or anywhere you’d use green onions.
Popular hardneck varieties include Rocambole (rich, complex flavor but doesn’t store long), Purple Stripe (excellent for roasting), and Porcelain (large cloves with a long storage life).
Softneck Garlic
Softneck varieties (Allium sativum var. sativum) are what you typically find in grocery stores. They do well in Zones 5–9 and handle milder winters without the cold requirement that hardnecks prefer.
They don’t produce scapes, have more cloves per bulb (though smaller), and store considerably longer, up to 12 months under the right conditions.
Good softneck varieties include Artichoke types (large bulbs and reliable yields) and Silverskin types (long shelf life and are great for braiding).
Not sure which zone you’re in? The USDA Plant Hardiness Zone Map is the fastest way to find out. Zones 4–8 cover most of the continental US.
When To Plant Garlic
Timing is the single most important variable in garlic growing. Plant too late, and the cloves won’t establish roots before winter. Plant too early, and they’ll put up too much top growth before the cold hits.
The target window: 3 to 6 weeks before your first hard frost (when temps consistently drop below 28°F / -2°C).
For most of Zones 4–7, that’s mid-September through October. Zones 7–8 can often push into November. For those of you in Zone 6, we have a special Zone 6 planting guide for garlic that you can reference for more details.
The goal is to get roots established and a small amount of green growth showing above ground before the ground freezes, but not so much growth that the plant is stressed by frost.
If you’re unsure of your first frost date, check the Old Farmer’s Almanac frost date calculator using your zip code.
Preparing the Bed
Garlic is a heavy feeder and rewards well-prepared soil. Here’s what to focus on before planting:
- Drainage. Garlic hates wet feet. If your soil is heavy clay, amend with compost or consider raised beds. Sitting water causes bulb rot.
- Fertility. Work in 2–3 inches of compost before planting. Garlic pulls a lot of nitrogen and phosphorus, so a balanced slow-release fertilizer mixed in at planting time is worth doing.
- pH. Aim for 6.0–7.0. A simple soil test (available at most extension offices or garden centers) takes the guesswork out of the equation.
- Loose, deep soil. Till or fork the bed to at least 8 inches. Garlic bulbs need room to expand; compacted soil produces small, misshapen bulbs.
How To Plant Garlic Cloves Step by Step
Once your bed is prepped, the planting process itself is straightforward.
Break Apart the Bulb
Do this the day you plant, not weeks ahead. Separate cloves from the bulb carefully, keeping the papery skin intact on each clove. Damaged or skinless cloves are more vulnerable to rot and disease.
Choose the Best Cloves
Always plant only the largest, healthiest cloves. The size of your clove directly correlates to the size of your future bulb. Set aside small or soft cloves for cooking, and save your best for seed stock.
Discard anything that shows mold, soft spots, or unusual discoloration.
Plant at the Right Depth and Spacing
Push each clove into the soil pointed end up, root end (flat base) down. Depth matters: plant with the top of the clove 2 inches below the soil surface. Too shallow, and it’ll heave out during freeze-thaw cycles; too deep, and emergence is sluggish.
Space cloves 6 inches apart in rows 12 inches apart. This gives each plant enough room to develop without competing for nutrients.
Water In and Cover
Water gently after planting to settle the soil around the cloves. Then apply your mulch; see the next section.
Mulching for Winter
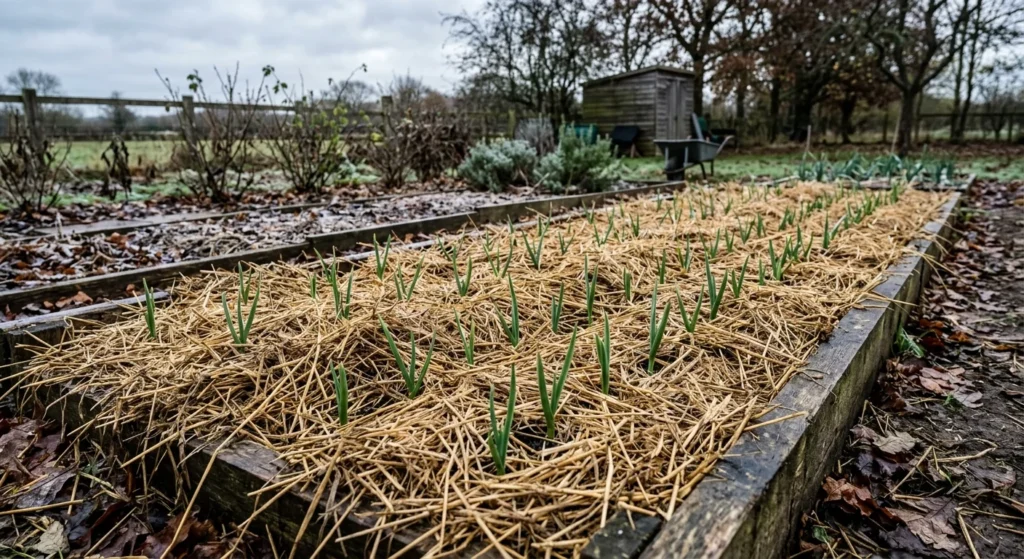
Once planted, mulch is your garlic’s best friend. It regulates soil temperature, prevents frost heaving, suppresses weeds, and conserves moisture.
Apply 3–6 inches of straw, shredded leaves, wood chips, or another type of mulch immediately after planting. This layer acts as insulation through winter.
In early spring, when shoots start pushing through, you don’t need to remove the mulch; garlic will find its way up through it. Just pull back any heavy clumps sitting directly on top of emerging shoots if they seem stuck.
Spring Care: What To Do When Garlic Wakes Up
When soil temperatures consistently hit 50°F, your garlic will start putting up green shoots. This is where the second phase of care begins.
- Fertilize. Side-dress with a nitrogen-heavy fertilizer (fish emulsion works well) when shoots are 4–6 inches tall. Do this once more 3–4 weeks later. Stop fertilizing entirely once the scapes appear or by early June; you want the plant to shift energy from leaf growth to bulb development.
- Water consistently. Garlic needs about 1 inch of water per week through spring. Keep the soil evenly moist but not waterlogged. Taper off watering in the final 3–4 weeks before expected harvest.
- Weed. Garlic doesn’t compete well with weeds. Keep the bed clear, especially early in the season.
What Are Scapes? Should You Cut Them?
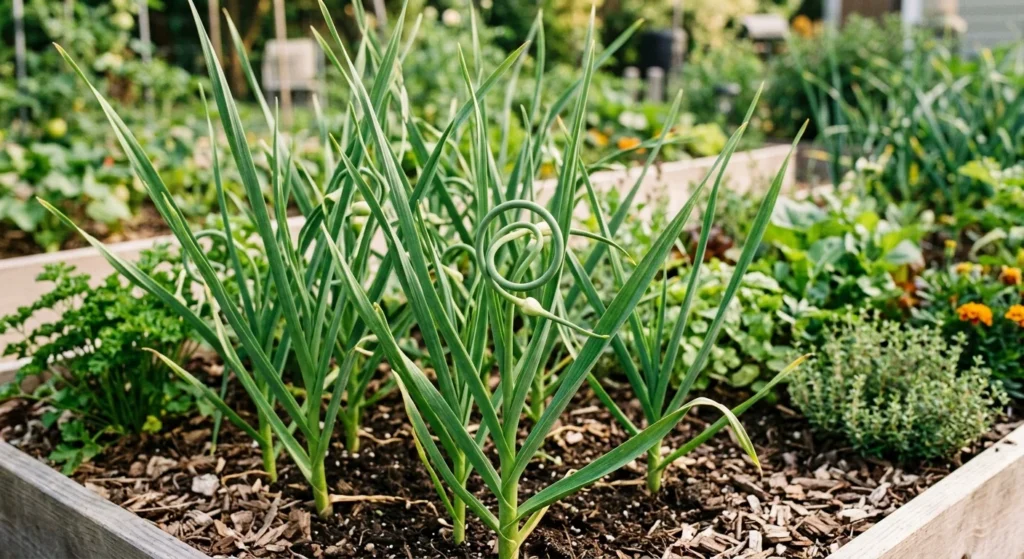
If you’re growing hardneck garlic, you’ll notice something strange in early summer: a curling, twisting stalk emerging from the center of the plant. That’s the scape, the garlic’s attempt to flower and reproduce.
Cut it off. Leaving scapes on the plant redirects energy into seed production rather than bulb development. Removing scapes can increase bulb size by 20–30%.
Cut them when the scape has made one full curl, snipping at the base where it emerges from the leaves.
Scapes are delicious. Use them like green garlic in stir fries, compound butter, garlic bread, or blended into pesto.
Companion Planting With Garlic
Garlic earns its keep beyond the kitchen; it’s a useful companion for many garden plants. Its sulfur compounds repel a range of common pests, and it’s generally easy to work into existing beds.
Good neighbors for garlic:
- Roses: Garlic deters aphids, which love roses.
- Tomatoes: Helps repel spider mites and Japanese beetles.
- Brassicas: Confuses cabbage moths and aphids.
- Carrots: The relationship is mutually beneficial; the carrot fly avoids garlic.
Avoid planting garlic near: Beans, peas, or any legumes. Garlic inhibits their growth.
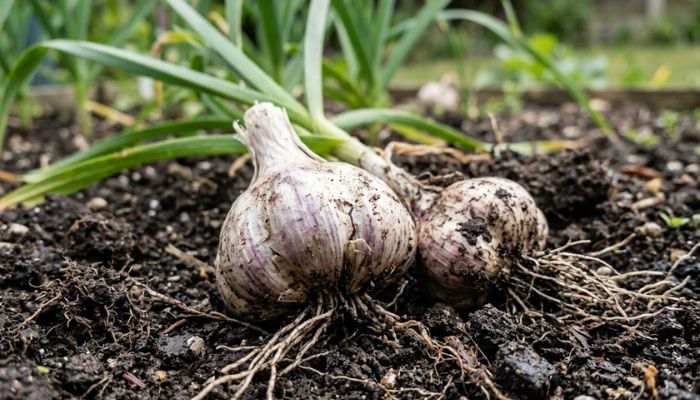
Knowing When To Harvest
Garlic gives you clear signals when it’s ready for harvesting. Watch for the lower leaves to turn brown and die back while the upper leaves remain green. A common rule is that when roughly half the leaves have browned, it’s time.
For most zones, that window falls in late June to mid-July.
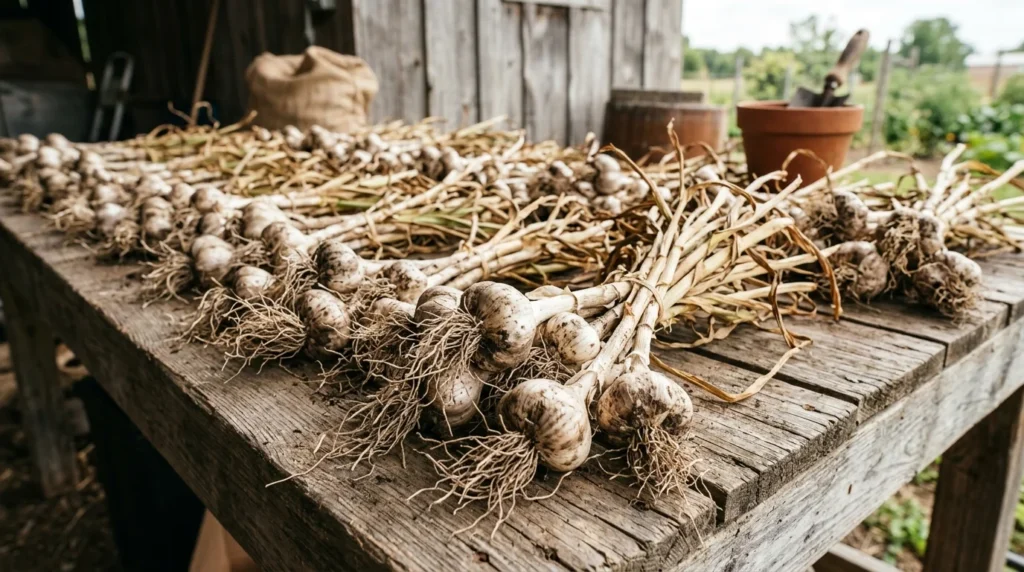
Don’t wait too long. Over-mature garlic splits its wrapper and won’t store well.
Use a garden fork, not a trowel, to lift bulbs. Push the fork in several inches away from the plant to avoid piercing the bulbs, and then lever upward gently.
After harvest, cure in a dry, well-ventilated spot out of direct sun for 3–4 weeks. Hang in bundles or spread on screens. Properly cured garlic stores for months.
Planning the Rest of the Cycle
Once your garlic comes out of the ground in July, you’ve got a bed of rich, conditioned soil just sitting there for the rest of the summer. That’s prime real estate, and there are smart, productive options for what to plant next.
See What To Plant After Garlic for specific combinations that work.
How To Grow Garlic From Cloves: Finding Success
Garlic is genuinely one of the most beginner-friendly crops you can grow, once you understand the timing.
The whole process is counterintuitive at first: you plant in the fall, wait all winter, tend through spring, and harvest in summer, but that rhythm makes sense once you’ve done it once.
And after your first successful harvest of pulling those fat, papery bulbs out of the ground you prepared months earlier, you’ll set aside your best cloves without even thinking twice.
Start with one bed. Pay attention to your soil. Plant on time. The rest mostly takes care of itself.