
Recent advancements in gardening and agriculture have resulted in the creation of techniques that improve the use of resources and promote plant growth. These methods are becoming increasingly popular as they evolve over time.
Among these groundbreaking approaches, the nutrient film technique – nft – hydroponic system stands out as a remarkable solution for growing plants without soil.
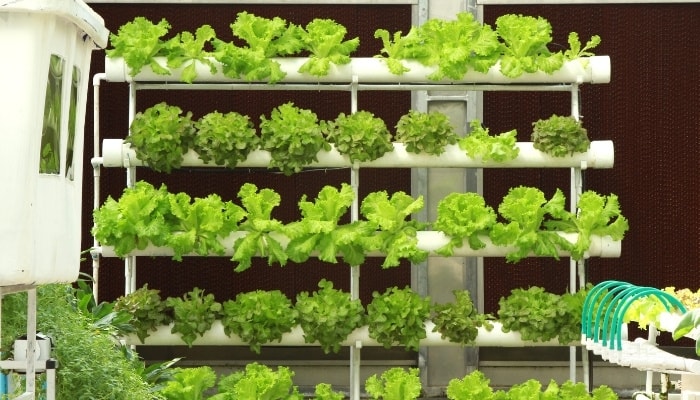
With its efficiency, versatility, and potential for sustainable cultivation, the NFT system has captured the imagination of home gardeners, urban farmers, and commercial growers alike.
What Is NFT Hydroponics?
NFT, or nutrient film technique is a kind of recirculating hydroponic system.
The nutrient film technique gets its name from the very low-flow irrigation that feeds the plants in the system. Water is pumped into a flat channel slowly so that a thin “film” of nutrient solution is constantly present.
How Does NFT Work?
NFT is designed around that thin film of liquid running through the system.
When root systems touch the film, they can drink up the nutrient solution they need without sacrificing aeration. By balancing the right amount of water, nutrient concentration, and oxygen in the system, impressive yields can be achieved with little effort.
Here’s a quick look at how the nutrient film technique works…
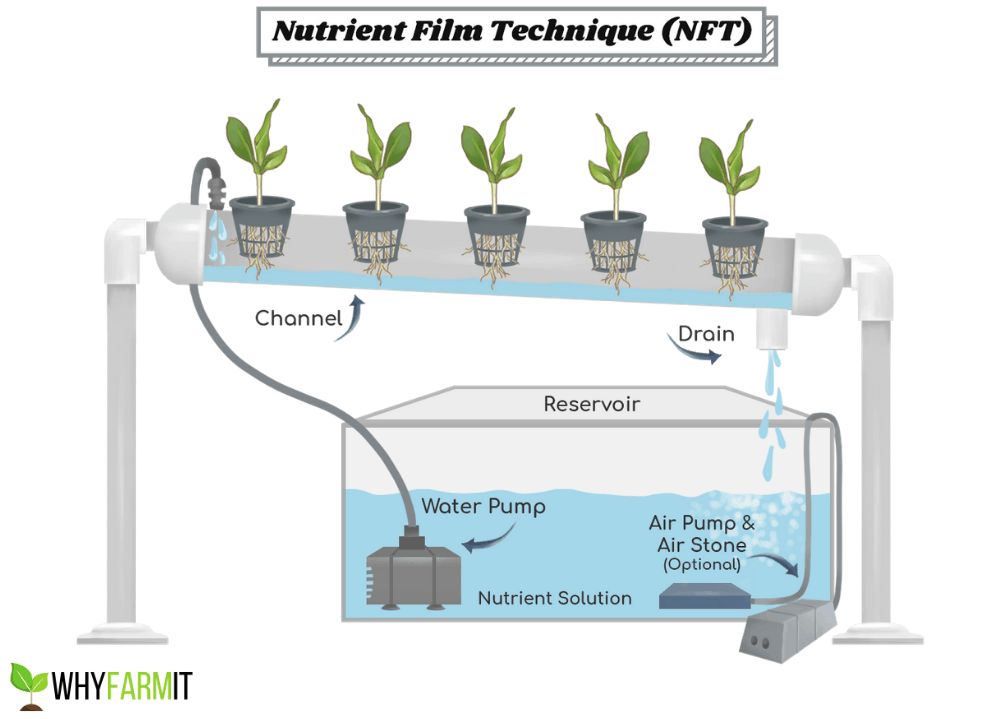
A long flat channel, almost something like a rain gutter on your house, is set up at a slight angle.
Holes are drilled in the top of the channel to house net cups with seedlings in them.
A reservoir with a water pump sends nutrient solution up to the channel where it flows down pulled by gravity, contacting the plant’s roots along the way to deliver nutrients.
At the end of the channel, the flow of water drains down into the same reservoir where it started.
This system is very similar to an ebb-and-flow system, except that with NFT the irrigation runs constantly and only a thin film of water is allowed to drip through the channel.
Here’s a more detailed look at each of the components of an nft system:
NFT Channels or Grow Trays
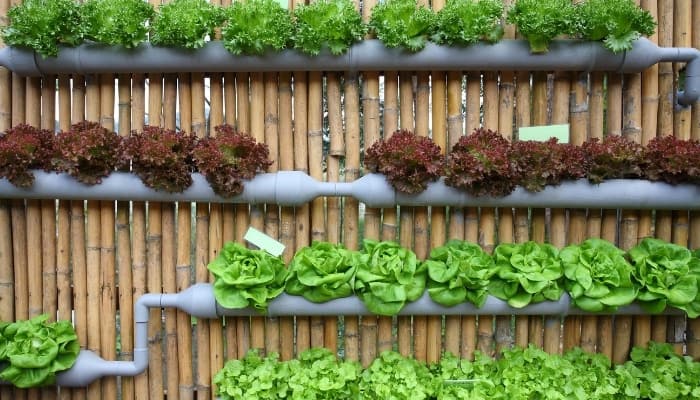
NFT channels are the heart of the system. These are shallow, sloping flat-bottomed channels or gutters through which a thin film of nutrient-rich water flows, allowing the plant roots to absorb the nutrients.
NFT channels can be made from various materials, such as PVC pipes, plastic gutters, or other hydroponic channel systems.
Water Reservoir
The water reservoir holds the nutrient solution that will be circulated through the NFT channels. It can be a simple plastic container or bucket. The size of the reservoir depends on the number of plants and the system’s size.
Water Pump
A water pump runs constantly and is used to circulate the nutrient solution from the reservoir to the top of the NFT channels.
The pump on the high end of the channel maintains a steady flow of nutrient solution that forms a shallow film over the bottom of the channels before draining back into the reservoir.
Timer
A timer controls the on-off cycles of the water pump. It ensures that the nutrient solution flows through the NFT channels at regular intervals, providing the plant roots with nutrients and oxygen.
Growing Medium or Net Pots
Small pots or containers called net pots are used to hold the plants and their bare root systems in place within the NFT channels.
Depending on the type of plants, you might use a growing medium like rockwool cubes, coconut coir, or perlite to provide support and stability for the plants.
Nutrient Solution
The nutrient solution is a mixture of water and hydroponic nutrients that provides essential elements for plant growth. It’s pumped through the NFT channels, allowing the roots to absorb nutrients as they grow.
You’ll need a balanced hydroponic nutrient solution designed for the specific type of plants you’re growing. These nutrients provide the necessary macro and micronutrients for healthy growth.
pH and EC/TDS Meters
The pH and electrical conductivity (EC) or total dissolved solids (TDS) meters are essential tools for monitoring the pH level and nutrient concentration of the solution. These meters help you maintain the proper nutrient balance for optimal plant growth.
Adjustment Kit for pH
To ensure that the pH of the nutrient solution remains within the desired range, you’ll need a pH adjustment kit that includes pH-up and pH-down solutions (this one also comes with a testing set). These solutions help you raise or lower the pH as needed.
Grow Lights (If Indoors)
If you’re growing plants indoors, you’ll need appropriate lighting. LED grow lights are commonly used for hydroponic systems as they provide the necessary light spectrum for photosynthesis.
Support Structure
Depending on the design of your NFT system, you might need a support structure to hold the NFT channels, reservoir, and other components securely in place.
Ventilation
Adequate ventilation is important to maintain proper airflow and temperature control in an indoor environment. Ventilation fans help prevent mold growth and ensure healthy plant development.
Air Stones or Air Pumps
While air stones and air pumps are not a standard requirement for NFT systems, they can be used in certain situations to enhance oxygen availability and temperature regulation.
However, for most small home-based NFT systems, proper nutrient solution management, regular maintenance, and maintaining a suitable environment are usually sufficient to support healthy plant growth without the need for additional oxygenation.
What Plants Grow Best In an NFT System?
As with most hydroponic systems, you can grow almost anything, but what you should grow is a different story. It all comes down to convenience and efficiency.
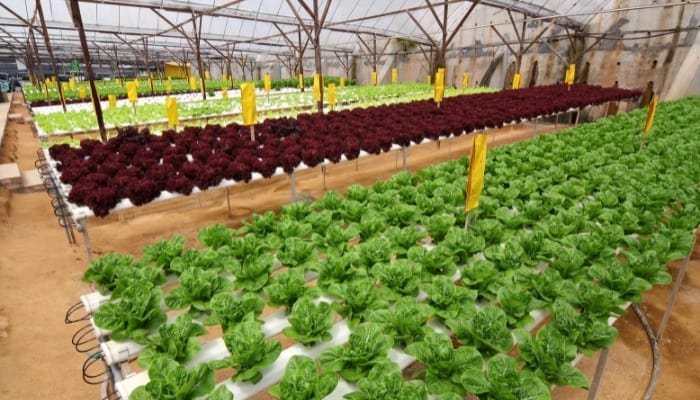
Most growers (including commercial growers) use NFT systems to grow leafy vegetables like lettuce, spinach, bok choy, kale, and herbs. These fast growing plants thrive under constant irrigation.
On the other side of the spectrum, certain fruiting plants such as tomatoes, peppers, and cucumber plants do better with carefully limited water supplies.
Also, because no growing media is used, other than maybe a small chunk of rockwool, larger plants will lack support in an NFT system.
You won’t be able to grow a large tomato plant in a system like this without building in some kind of trellis or support to keep it propped up and supported.
Using the NFT System – How To Set It Up
You can build an effective NFT system yourself at home. The materials to do this are affordable and the setup is simple.
You can tweak this system to your liking, using different materials or configurations.
What you will need:
- 4-inch PVC pipe
- 2 PVC end caps
- Plastic tote (5-gallon)
- 3-inch net cups
- Water pump
- ½-inch poly tubing
- Scrap wood (2×4)
How to Build an NFT Hydroponic System Step by Step
Step 1: Cut your 4-inch PVC pipe down to size. You can make this as short as you want or up to around 30 feet. This will be your channel.
Step 2: Drill a ½-inch hold into one of the end caps.
Step 3: Drill or cut a series of 3-inch holes in the top of your PVC pipe, about 8 inches apart to fit the net pots. This is where your plants will go.
Step 4: Drill a ½-inch hole into the bottom of the pipe on the opposite side of the holes you just cut.
Step 5: Attach the end caps.
Step 6: Take your plastic tote, and drill two ½-inch holes into the lid, one on the left and the other on the right. Place the water pump into the tote.
Step 7: Take your scrap 2×4 and cut two 6-inch sections. Cut a groove into each one, a simple “V” will do. These grooves are to hold your pipe in place. Cut or sand down one of these pieces on the bottom to make it slightly shorter than the other.
Step 8: Now decide where you want your NFT channel to sit. You can place it directly on the plastic tote or on a table or bench nearby. Set up your two pieces of wood, and place your pipe on top so that it rests securely in the grooves.
Make sure the shorter piece of wood is on the drain end so that water will run toward the drain.
Step 9: Cut a length of your ½-inch poly tubing long enough to connect the pump to the hole in the end cap. Stick one end of the tube into the end cap, run the other end through one of the holes on the reservoir lid, and attach it to the water pump.
Step 10: Cut a short length of ½-inch poly tubing to connect the small hole on the bottom of the PVC pipe to the other hole on the lid of your plastic tote.
Step 11: Place net cups with seedlings into the 3-inch holes in the pipe.
Step 12: Add nutrient solution, and turn on the pump.
NFT Tips for Channel Slope, Flow Rate, and Modifications
The root systems of your seedlings should just barely touch the bottom of the channel.
Tweak the flow of the pump so only a film of water runs through the bottom of the channel.
If you keep the water flow low and let it run constantly, you won’t need an air pump, air stone, timers, or any special equipment like that.
The slope of your NFT channel could be as low as 1:100 but most slopes run closer to 1:30 or 1:40. With the slope of a nutrient film technique system, the trick is to get a subtle decline but not allow any pooling to occur.
As long as a thin layer of water is flowing through the channel and draining on the end, you are golden.
A quick note on flow rate—
When channels are longer than 40 feet, your plants may suffer from a lack of nutrients. The plants closer to the source of the nutrient solution will suck up nitrogen, depriving the plants on the end of the channel of this essential nutrient.
When this happens, the plants on the end of the channel won’t grow properly.
To prevent this, all you need to do is keep each channel less than 40 feet.
Alternatively, you can make channels as long as you want and just add irrigation lines from separate reservoirs into the channel every 20 feet or so.
If you have multiple irrigation lines in your channel, make sure you turn down the flow of each of them. You don’t want twice as much water in your channel; you still just want a thin film.
AND, a note on air stones—
Some growers like to put an air stone into their NFT reservoir—this is unnecessary. The whole point of NFT is to keep the water levels low so the plant roots get plenty of oxygen but still contact enough solution to thrive.
If you need to add an airstone, you are probably running way too much water in your system, basically turning it into an ebb-and-flow system rather than a true NFT system.
Understanding Nutrients in a Nutrient Film Technique System
In an NFT system, the nutrient solution provides all the necessary elements that plants would normally obtain from soil. The primary nutrients that plants require are often categorized into macronutrients and micronutrients.
Macronutrients
Macronutrients are essential elements that plants need in relatively large quantities. These nutrients play a fundamental role in the overall growth and health of plants. The three main macronutrients are:
- Nitrogen (N): Nitrogen is essential for the development of leaves and stems. It’s a key component of chlorophyll, which is necessary for photosynthesis. Nitrogen deficiency can lead to stunted growth and yellowing of leaves.
- Phosphorus (P): Phosphorus is vital for energy transfer and the development of roots, flowers, and fruits. It supports overall plant growth and helps with the transfer of genetic information. A lack of phosphorus can result in poor root development and limited flower and fruit production.
- Potassium (K): Potassium is involved in various physiological processes, including water regulation, enzyme activation, and disease resistance. It helps plants tolerate stress and produce healthy flowers and fruits. Potassium deficiency can lead to weak plants and decreased disease resistance.
Micronutrients
Micronutrients are essential elements that plants need in smaller quantities, but they are equally important for proper growth and function. These nutrients include:
- Calcium (Ca)
- Magnesium (Mg)
- Sulfur (S)
- Iron (Fe)
- Zinc (Zn)
- Copper (Cu)
- Manganese (Mn)
- Molybdenum (Mo)
- Boron (B)
Each of these micronutrients serves specific roles in plant development, ranging from photosynthesis to enzyme activation.
Micronutrient deficiencies can lead to a range of issues, including poor fruit formation, reduced flowering, and overall poor plant health.
Nutrient Solution Preparation
When using an NFT system, you need to prepare a nutrient solution that contains the necessary macronutrients and micronutrients in the appropriate concentrations for your plants.
Commercial hydroponic nutrient solutions are available and formulated to provide a balanced mix of nutrients. You can also mix your own nutrient solution using water-soluble fertilizers.
It’s important to regularly monitor the pH and electrical conductivity (EC) or total dissolved solids (TDS) of the nutrient solution.
Adjust these parameters as needed to ensure that your plants receive the proper nutrients in the correct proportions. As plants grow and their nutrient needs change, you may need to modify the nutrient solution accordingly.
Routine Maintenance for an NFT Hydroponic System
Routine maintenance is essential to ensure the system operates efficiently and the plants thrive.
Keep in mind that the specific maintenance tasks may vary depending on the type of plants you’re growing, the size of your NFT system, and the environmental conditions in your growing area.
Maintaining detailed records of your maintenance activities and the progress of your plants will enable you to refine your routine over time for the best possible results.
Here’s an overview of the routine maintenance tasks involved with an NFT hydroponic system:
Nutrient Solution Management
Proper management of the nutrient solution is crucial for the health and growth of your plants.
Regularly check the pH of the nutrient solution, and adjust it to the optimal range (usually between 5.5 and 6.5). Monitor the nutrient concentration using a meter, and make necessary adjustments based on the growth stage of your plants.
Regularly replace the nutrient solution to prevent imbalances and the accumulation of salts that can harm plant roots.
Water Quality
Maintain the quality of the water you use in your NFT system. Use clean, filtered water to prevent clogs and to avoid introducing contaminants into the system.
Regularly clean and maintain the water reservoir to prevent the growth of algae or other pathogens that could affect your plants.
Root Health
Regularly inspect the health of your plant roots. Look for signs of disease, rot, or blockages. Trim any damaged or dead roots to ensure the overall health of the plant.
Make sure that the roots are properly supported and in contact with the nutrient film as this is crucial for nutrient uptake.
Pump and Plumbing Maintenance
Keep a close eye on the water pump. Regularly check its functionality, and clean or replace it if it becomes clogged or shows signs of wear.
Inspect the plumbing and tubing for any leaks, blockages, or damage that could disrupt the flow of the nutrient solution to your plants.
Lighting
If you are using artificial lighting in your NFT system, it’s important to maintain the lighting fixtures. Regularly clean the light fixtures and replace bulbs as needed to ensure consistent light intensity.
Also, make sure to maintain the appropriate light cycle for the specific growth stage of your plants.
Temperature and Humidity
Monitoring and controlling the temperature and humidity levels in your growing area is essential. This helps prevent the growth of mold and ensures optimal plant growth conditions.
Make adjustments as necessary to maintain a suitable environment for your plants.
Pest and Disease Management
Regularly inspect your plants for any signs of pests or diseases. Implement appropriate measures, such as introducing beneficial insects or using organic sprays, to address any issues you identify.
Isolating infected plants can also prevent the spread of problems.
Harvesting and Pruning
Regular harvesting of mature plants is important to create space for new growth. Additionally, pruning your plants as needed helps maintain proper airflow, prevents overcrowding, and promotes healthy growth patterns.
System Cleaning
Perform routine cleaning of the NFT channels to prevent the growth of algae and the accumulation of nutrient residues.
Use a mild cleaning solution, and avoid abrasive materials that could damage the channels. This ensures the smooth flow of the nutrient film and prevents potential blockages that could clog the system.
Regular Observations
Consistently observe your plants for any signs of stress, nutrient deficiencies, or other issues. Taking prompt action based on your observations can prevent problems from escalating and help your plants thrive.
NFT Pros & Cons
The nutrient film technique is so widely used for good reason, but it can’t do everything. Here are a few advantages of NFT and limitations to be aware of.
Pros
- Very water efficient
- Mostly passive system
- Perfect for leafy vegetables
- Inexpensive to build
Cons
- Not ideal for fruit-bearing or large plants
- Recirculating systems run the risk of spreading diseases from plant to plant
- The system retains no moisture, so in the event of a power outage your plants may be damaged or killed from a lack of water
NFT Frequently Asked Questions
How Do You Start Plants For an NFT System?
You can start your seeds or use seedlings like you would in any other hydroponic systems.
Take a piece of rockwool (or a Rapid Rooter) soaked in water or a gentle nutrient solution and place your seed in it. Pop it into a tray and set it in the sun or under grow lights.
Once the seedling has developed a strong root system, just place it into a net cup and put it into your NFT system.
The only trick is to make sure that the plant roots will reach the film of nutrient solution on the bottom of the channel from the moment the seedling enters the system.
If the roots or rockwool don’t yet reach the nutrient solution, you can set your seedling to grow a while longer in a deep water culture, ebb and flow, or Kratky system to allow the roots to lengthen.
Alternatively, you can just put the seedling into your NFT channel and temporarily increase the water flow so the roots or rockwool touch the solution.
But, be sure to turn the water back down once the roots are long enough. You don’t want to run too much water in an NFT for very long or you will starve the plants of oxygen.
Also, be sure to check the ph and nutrient levels on a regular schedule and dispose of used nutrient solution properly.
Are There Premade NFT Kits For Sale?
Yes, you can find fully-equipped premade NFT hydroponic kits online, like this one on Amazon.

These systems are great if you want to quickly jump into NFT hydroponics and don’t want to spend the time rigging together a DIY build.
However, buying a premade NFT system will cost you a bit more than building one yourself.
Can You Use an NFT System Indoors?
Yes, the only difference is that you will need to put your system somewhere with an ample amount of sunlight or use grow lights.
Because most of us don’t have that much natural lighting indoors, the best course of action is to invest in a quality fluorescent or LED light.
With grow lights, I always recommend going for a full-spectrum light that emits both blue and red light.
Blue light promotes chlorophyll production and foliar growth while red light encourages blooming.
While leafy greens can get by with just blue light, you will get the healthiest plants and have the most versatility with a full-spectrum bulb.
For an average-sized NFT system, I’d recommend a light like this one.
This is an affordable LED grow light that has enough power for your NFT and has better coverage than popular square-shaped grow lights.)
An LED light should be positioned 12 to 24 inches above your plants. Just make sure to leave plenty of headroom to grow plants!