
The longer your garden thrives, the more apparent it becomes that a practical solution is necessary to alleviate the strenuous process of hand-watering.
You’ve likely heard of micro-irrigation that delivers teeny trickles of water to your beloved plants? Well, drip tape irrigation is one such efficient method.
What is irrigation drip tape? Irrigation drip tape is a flat length of thin-walled tubing that lies on the soil before expanding when it is pressurized with water. Drip tape is perforated at even intervals or built with internal emitters that weep droplets directly into the soil, watering plant roots with minimal waste.
Drip tape (or “dew hose” as it was originally known in the early ‘60s) is super versatile as it can be cut to size for use in modest or large-scale gardens and provides an eco-friendly way to hydrate your plants.
Let’s explore what drip tape is all about plus common queries and how to install your own…
Drip Tape vs. Drip Line
Both types of irrigation have drip emitters built into their pipeline, but the individual materials and uses of each are quite different:
- Drip tape is a thin-walled tube (typically between 0.55-0.3 millimeters thick) that lies flat until pressurized, while drip lines are solid, structured pipes with a wall thickness of around 0.9-1.2 millimeters.
- Drip line pipes are more durable, allowing them to be used on long-term crops. They can also run at much higher water pressures – between 15-60 Psi (Pounds per Square Inch), compared with drip tape tubing which splits if water pressure exceeds 15 Psi.
- Drip tape can be recoiled more easily after use than drip line due to its flat nature and coil length of around 1,000-3,000 meters, whereas structured drip line pipes come in 100- to 400-meter coils and can’t store as easily.
Is Drip Irrigation Better Than Sprinklers?
Sprinklers are well suited to hydrating vast flat areas, such as lawns and extensive flowerbeds, in hot climates.
The low-flow, more efficient method of drip irrigation, however, is best for areas that need specific watering schedules, delivering water steadily into the soil.
This gentle application doesn’t risk the soil eroding at the root of trees or damaging foliage in the way sprinklers can. Think of it as the difference between refreshment and nourishment.
Is Drip Irrigation Expensive?
Drip irrigation systems have steep initial costs, but as this method minimizes water run-off and evaporation, you’ll see a gradual saving due to lower water bills.
According to HomeAdvisor, the average cost to install drip irrigation ranges between $1,800-$2,500 per acre and may cost as little as $50 for small gardens.
Keep in mind that drip irrigation systems are installed either above ground or sub-surface (buried under mulch) with the latter option almost doubling the overall costs per acre.
Drip Tape Benefits
The targeted, low-pressure nature of drip tape irrigation reduces water costs and minimizes the risk of plant disease due to minimal water contact with foliage/stems.
It also reduces soil erosion and enables rows between plants to dry due to the direct, efficient application.
How Much Water Does Drip Tape Save?
Drip tape systems are reportedly 95% efficient, using around 20% less water than standard spray irrigation systems “making nearly every drop count,” according to Richard Restuccia, Vice President of Water Management Solutions at Jain Irrigations Systems.
Drip Tape Disadvantages
- Emitters become clogged over time by dirt particles, requiring regular monitoring/replacement of the filters.
- The tape/pipeline needs to be wound up and re-installed each season, according to crop type.
- The thinner-walled polyethylene resin tubing deteriorates fairly quickly in sunlight/heat.
- Setup costs can be expensive depending on the scale.
- Drip tape can only be installed in straight lines.
Drip Irrigation vs. Soaker Hose
Soaker hoses are essentially coiled garden hoses with several holes punched in. These are made from ultra-porous rubber, allowing water to weep slowly into the soil below.
Unlike drip irrigation systems that are laid out in long, straight lines along plant rows, soaker hoses are placed in coiled snake-like mounds directly on top of the soil and have no other components besides a water source.
The low installation cost and concentrated watering can make soaker hoses ideal for small gardens.
However, hoses are more susceptible to damage and have no form of pressure adjustment/regulation.
Where To Use Drip Tape
Drip tape is best used in larger gardens with long, straight runs and is great for delivering water directly to trees and shrub roots.
It is also commonly used alongside capillary mats to bottom-water container plants, and as the tape can be cut to size, it can also be used in raised beds.
NOTE: While it can cope with slightly sloped gardens, drip tape is not designed to work on curves, bends, or dramatic elevations.
Does Drip Tape Need To Be Buried?
It’s not necessary, but many recommend burying drip tape using a long-handled garden hoe or high-arch wheel to make a trench.
This is primarily so your plants can receive the maximum amount of water that is otherwise lost to surface evaporation during summer.
Burying the tape also prevents rodent damage and keeps it in place, safe against the natural elements.
How Deep Should I Bury Drip Tape?
According to the Center for Agriculture at the University of Massachusetts, drip tape should be buried between 6-12 inches deep and can be buried at shallower depths in sandy soil compared with loam soil types, as water moves upward from the tape more effectively in loam soil.
Does Drip Irrigation Go Under Landscape Fabric?
Drip irrigation systems can be placed under landscape fabric as the cloth barrier helps protect the tubing from UV damage. However, mulch fulfills this with better long-term results.
John, a long-standing member of the Gardenality forum, advises, “only using mulch instead of a landscape fabric,” explaining that “over time, dirt, and plant debris builds on the fabric, sealing it somewhat, while mulch will stay moist and not get hard/crusty.”
How Long Does Drip Last?
Drip tape tubing lasts between 1 and 5 years or between 10 and 30 years for structured drip line systems.
Timely repairs with electrical tape to fix leaks and burying tubing below ground can help them last a little longer.
What Time of Day Is Best for Drip Irrigation?
As drip irrigation limits water contact with foliage, mornings or evenings are perfectly fine times to run your system.
How Long To Run Drip Irrigation
How long you should run your drip irrigation setup will depend on several factors, such as the type of emitters used (ranging from 0.5 gallons per hour to 4GPH), emitter spacing along the tubing, and the soil type (water-retaining soil or not).
Gardener Greg Alder from The Yard Posts advises running your drip system for 30-45 minutes every 3 days and observing how your plants respond (signs of wilt? etc.) before making adjustments to the emitter type or drip duration.
To precisely calculate the flow rate for your drip irrigation system, decide how long the run length of the row will be and the emitter spacing.
Using a commercial-scale drip system as an example, 6 inches emitter spacing x a 65-meter row length x 0.4GPH per dripper = a flow rate per row of 171GPH.
For more precise guidelines in terms of soil texture and its impact on irrigation duration, Penn State University illustrates how this works in vegetable gardens here.
Drip Tape Irrigation System
A drip tape irrigation system is essentially a flat tape-like pipeline made from polyethylene with drip emitters or slits (no larger than a pinhole) embedded into the tubing and spaced at even intervals.
Single/multiple reels of tape can be laid out along the length of a crop row or bed and connected to mainline poly tubing, which is then connected to your main water supply.
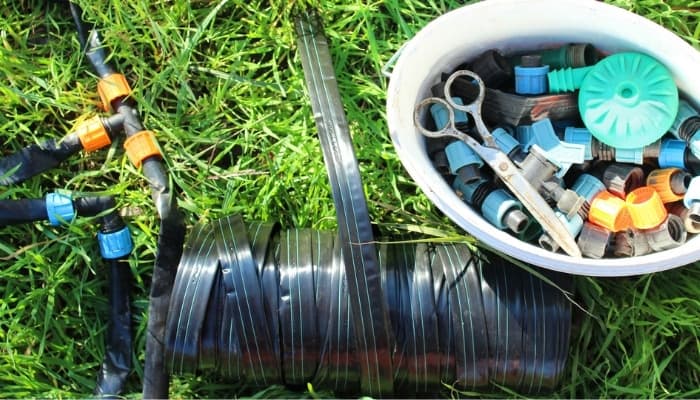
The basic components are:
- Water source (via water pump or free-standing faucet)
- Mainline/header poly tubing
- Drip tape reel
- Adapters
- Pressure-regulating valve
- Filter
- Tape end-caps
- Power-loc starter fittings
- Coupler (for connecting two lengths of drip tape)
- Backflow preventer (to prevent irrigation system water flowing back to the potable water supply)
- Mainline hole cutter/puncture tool
Large-scale garden projects may require a professional irrigation installer. Otherwise, small to mid-sized areas can attempt a simple DIY install or use a drip tape kit:
Irrigation Mart Drip Tape Kit
This easy-to-install and expandable drip tape kit connects to any standard faucet/garden hose and includes 1,000 feet of 5/8-inch drip tape with pre-installed 12-inch spaced emitters.
It also comes with 100 feet of 1/2-inch poly mainline tubing and 10 row valves, plus a filter and pressure regulator.
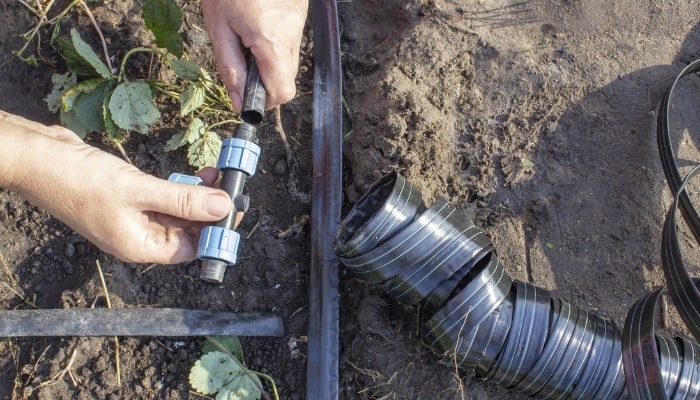
How To Install Drip Tape
- Measure the distance from your water source to your garden bed/area, and lay out your mainline poly tubing according to your measurements.
- Attach a backflow preventer to your water source, and add a fixed-pressure regulator (10 Psi is ideal). You can also add a timer (optional) to your faucet.
- Next, add a Power-loc starter onto the end of your pressure regulator (this comes in single female starters or “T” shapes depending on the design). You can then add your poly tubing to the end.
- Lay out the mainline poly tubing in your garden, securing it in place with mounting clips/ground staples.
- Make puncture holes in the main tubing and insert adapter valves into the holes. Next, push the drip tape over the barb of the adapter valve and lock the tape in place.
- Cut the drip tape to the desired length along each row, and cap off the end using an end cap.
Repeat steps as needed for your garden area.
Final Thoughts
Drip tape irrigation provides you with a simple method of watering a large number of your garden plants or vegetable crops simultaneously, and its trickle-down system conserves much more water compared with spray irrigation methods.
Though the initial costs to install can be steep (especially in larger gardens), this can be a worthwhile investment as you’ll not only lower your water bills, but the direct dripping into the soil minimizes the risk of plant disease, making it an efficient and healthy choice!