
Keeping bees is one of the most rewarding things you can add to a homestead or backyard… and also one of the most misunderstood. People picture it as either dangerous or impossibly complex, when the truth is somewhere in between.
Beekeeping takes some learning, a bit of investment, and genuine attention, but you don’t need to be an expert to get started. You just need to know what you’re actually signing up for before you spend a dime.
This guide walks you through everything that matters in your first year: what to sort out before you buy bees, the equipment you need (and what you can skip), how to source your first colony, and what a realistic first-year timeline looks like.
If you’ve already been thinking about bees but haven’t pulled the trigger yet, this is the place to start.
For a closer look at solitary bees that require almost no equipment or management, check out our mason bee guide. These bees are a great low-stakes entry point while you decide if you want to go further with honeybees.
Before You Buy a Single Bee
The worst way to start beekeeping is to order bees first and figure everything else out later. Do that, and you’ll be scrambling when your package arrives in April, and you have nowhere to put your bees. Start here instead.
Check Your Local Laws
Beekeeping regulations vary more than most people expect. Some cities and counties have no restrictions at all. Others require registration, limit the number of hives you can keep, mandate setback distances from property lines, or ban backyard beekeeping entirely in residential zones.
Before anything else, look up your local ordinances. Search your city or county name plus “beekeeping ordinance” or check with your local agricultural extension office.
Many states also have a state apiarist who can point you in the right direction. This takes about 30 minutes and can save you a lot of headaches.
If you’re in an HOA, check those rules as well. HOA restrictions aren’t always the same as municipal law, and violating them can be a separate problem.
Talk to Your Neighbors
Even where backyard beekeeping is perfectly legal, a heads-up to your neighbors goes a long way.
Most people’s fear of bees fades fast when they learn that honeybees are generally calm and only sting when they feel threatened and that you’ll be managing the hive to keep aggressive behavior in check.
A jar of honey once a year doesn’t hurt either.
If a neighbor has a genuine bee allergy, take it seriously. Discuss hive placement, and let them know how you’ll manage the situation.
Strained neighbor relationships are one of the real reasons people end up quitting beekeeping, and it’s mostly avoidable with a direct conversation upfront.
Be Honest About the Time Commitment
Beekeeping is not a set-it-and-forget-it hobby. During the active season (roughly April through September in most of the U.S.), you’ll want to inspect your hive every 7–10 days.
Each inspection takes 30–60 minutes, depending on the hive and your experience level. Add in travel time if you’re keeping bees off-site. Understand that a single hive can easily be a 4–6 hour per month commitment during spring and summer.
Winter is quieter. You’ll check in periodically rather than doing full inspections, but spring preparation and fall winterizing both require time and attention.
Starting with two hives is the most common recommendation for beginners, not because one isn’t enough, but because having two lets you compare colonies.
If something seems off in one hive, you can look at the other to figure out if it’s normal or a problem. It also gives you a backup if one colony fails.
The Equipment You Actually Need
You don’t need to buy everything at once, but some things are non-negotiable before your bees arrive. Here’s the honest breakdown.
The Hive
The Langstroth hive is the standard for beginners in North America. It’s modular, so you add boxes (called “supers”) as the colony grows, and parts are interchangeable between brands.
Equipment for Langstroth hives is widely available, and most beekeeping resources assume you’re using one.
A basic Langstroth setup for year one includes:
- 1–2 deep hive bodies (the brood boxes where the bees live and raise young)
- 1 medium super (for honey storage)
- Frames and foundation for each box
- A bottom board, inner cover, and telescoping outer cover
You can buy pre-assembled kits or build your own if you’re handy. For most beginners, a kit from a reputable supplier is the right call.
Learn about your hive options in our comprehensive guide “Best Beehive for Beginners.”
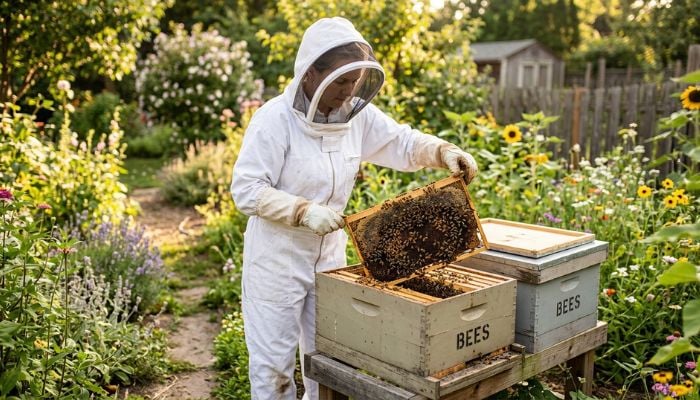
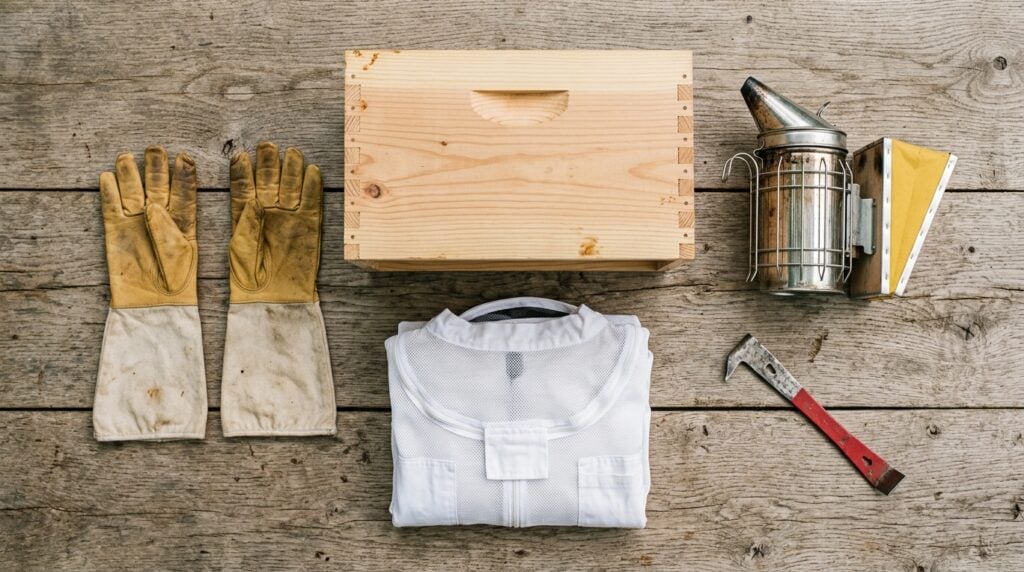
Protective Gear
Get a full suit and veil, especially as a beginner. You’ll be calmer, the bees will be calmer, and you’ll actually enjoy inspections instead of dreading them.
A lot of experienced beekeepers eventually work with minimal protection, but don’t feel any pressure to do that in year one.
Gloves are somewhat controversial in the beekeeping world. Some keepers skip them because gloves make fine manipulation harder and can transfer alarm pheromones to the hive. Start with gloves, and decide later, as you get more comfortable, if you still need them.
The Smoker
A smoker is one of the most important tools you’ll own. Smoke masks alarm pheromones and triggers bees’ instinct to gorge on honey, which makes them calmer and easier to work with.
A cheap smoker is a frustrating smoker. Get a decent stainless steel one with a heat shield. You’ll thank yourself every single inspection.
Smoker fuel can be pine needles, wood chips, burlap, cotton, or dried leaves, i.e., anything that produces a cool, white smoke. Experiment to find what works for you.
The Hive Tool
A hive tool is a flat pry bar used to separate hive boxes and frames, which bees glue together with propolis (a resin they collect from plants). You’ll use it constantly. Get two; they’re cheap and easy to lose.
What You Can Skip (for Now)
- Queen excluders: Some beekeepers use them to keep the queen out of honey supers. Others don’t bother. Skip it the first year.
- Entrance reducers: Useful for small colonies and winter, but you don’t have to have them on day one.
- Fancy extractors: You won’t need to extract honey in your first year. The colony needs to build up its population and stores first.
Where To Get Your Bees
There are three main ways to start a colony. Each has trade-offs.
Package Bees
A package is a screened box containing about 3 pounds of bees (roughly 10,000 workers) and a mated queen in a separate cage. Packages are the most common way beginners start and are widely available from suppliers who ship by mail or sell locally.
The upside is that packages are relatively affordable, widely available, and let you start with a known number of bees.
The downside is that the queen has no relationship to the worker bees because she was introduced into the package artificially. Queen acceptance can sometimes be an issue, and a packaged colony has to build entirely from scratch, which means a slower start than a nuc.
Order packages early, by January if you can. Reputable suppliers sell out fast, especially for spring delivery.
Nucleus Colony (Nuc)
A nuc is a small, established colony with usually 4–5 frames of bees, brood, honey, and a laying queen who was raised alongside her workers. Nucs establish faster than packages because the colony already has a functioning family unit. The queen is usually already proven.
Nucs are more expensive than packages and often harder to find. They’re also more variable in quality. Source from a local beekeeper you trust rather than an unknown supplier if you can.
If you can get a nuc from a local beekeeper who’s been raising bees in your region, that’s generally the best possible start. Local bees are already adapted to your climate and forage options.
Catching a Swarm
Swarms are free colonies looking for a new home, and catching a swarm is not as dramatic as it sounds. A swarm is usually very gentle because the bees are full of honey and have no home to defend.
If you register with your local beekeeping association, you can get added to a swarm call list and be contacted when someone spots one.
The catch (so to speak) is that swarms are unpredictable. You might catch three in a spring or none at all.
It’s worth remembering that a swarm-caught colony can present unknown risks. You don’t know the queen’s genetics, age, or disease history.
It’s a good option for an established beekeeper looking to expand, but it’s a shaky foundation for a first hive where you’re still learning the basics.
Your First Year, Month by Month
Beekeeping is deeply seasonal. Here’s what a typical first year looks like in a temperate U.S. climate (adjust based on your region).
January–February: Order and Prepare
This is the time to order your bees if you haven’t already. Package bees and nucs ship from March through May, depending on the supplier and your location, but the slots fill up fast.
Assemble your equipment, paint exterior wood surfaces if needed, and choose your hive location.
For good hive placement, choose a spot with morning sun (helps bees get active early), with afternoon shade (prevents overheating), that’s sheltered from prevailing winds, and with a clear flight path in front of the entrance.
Keep the entrance facing southeast if you can. Make sure you can stand comfortably behind and beside the hive during inspections.
March–April: Installation
When your bees arrive, install them as soon as possible.
- Package bee installation involves introducing the queen cage into the hive and letting the workers release her over a few days.
- Nuc installation is simpler. You transfer the frames directly into your hive body.
Don’t open the hive for the first week. Let the bees orient and the queen get established. After that, start weekly inspections.
May–June: Build-Up
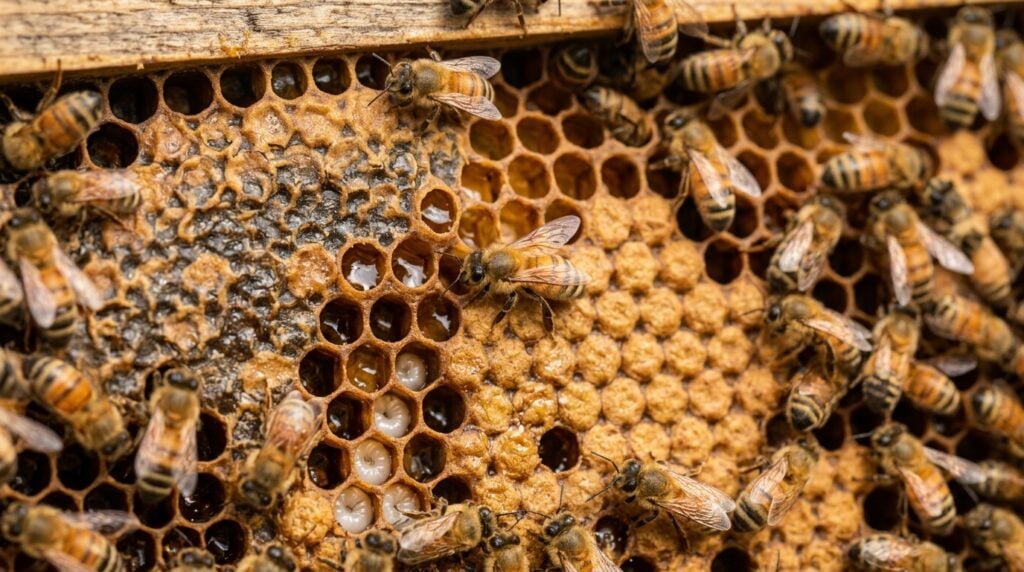
Spring is when the colony grows fast. You’ll see increasing numbers of bees, capped brood, and, if all is well, a healthy laying pattern from the queen. The time to add a second brood box is when the first is about 80% full.
Pay attention to swarm signs: queen cells (peanut-shaped cells, usually along frame edges or bottoms), very crowded frames, and bees clustered outside the entrance (“bearding”).
Bees swarm when they feel cramped. Adding space preemptively is the easiest prevention.
July–August: Peak Season
During this time, your colony is at its strongest. Depending on your local forage choices, you might see a significant honey flow. Planting specific flowers for bees can improve your harvest.
You can add a honey super (an additional box intended for surplus honey). Don’t harvest in year one unless you have more honey than the colony needs to survive winter; they earned it.
This is also when Varroa mite populations peak. Test for mites (oxalic acid strips or an alcohol wash), and treat if needed. Varroa is the single biggest threat to managed honeybee colonies.
September–October: Fall Prep
Help your colony get ready for winter. Check honey stores. A colony needs roughly 60–80 pounds of honey to survive a cold winter.
If they’re short, feed them with a 2:1 sugar syrup (by weight). Stop feeding once temperatures consistently drop below 50°F, as they can’t process syrup when it’s cold.
Do a final mite treatment if populations are still elevated. Reduce the entrance to prevent robbing by other colonies and to keep mice out. Consider adding a mouse guard.
November–March: Winter
In the winter, the colony clusters for warmth and survives on stored honey. Don’t open the hive on cold days; you’ll break the cluster and chill the bees.
On mild days (above 50°F), you can do a quick check through the top to confirm the cluster is alive and has food nearby.
Make sure the hive has ventilation to prevent moisture buildup. Condensation dripping down onto the cluster is more dangerous to bees in the winter than cold temperatures.
What Can Go Wrong (and How To Handle It)
No first year goes perfectly. Here are the most common problems and what to do about them.
Queen Issues
A missing, failing, or poorly laying queen is one of the most common issues beginners encounter… and one of the easiest to misread. Signs of a queenless hive include no new eggs, a patchy or absent brood pattern, and a louder, more aggressive hive.
If you suspect a queen problem, first confirm it by looking for eggs (they look like tiny grains of rice standing upright in cells).
If there are no eggs and no capped brood, act fast. A colony without a queen can raise an emergency queen from young larvae, but you have a limited window. You can also purchase a mated queen from a supplier.
Varroa Mites
Varroa destructor is a parasitic mite that feeds on developing bees and transmits viruses. An untreated infestation will kill a colony, typically by the end of the second year.
Testing is simple (alcohol wash or sticky board count), and effective treatments exist, including oxalic acid vapor, strips, or approved miticides.
Don’t skip mite testing. It’s the single most impactful thing you can do to keep your bees alive.
Robbing
When nectar is scarce, strong colonies will raid weak ones for their honey stores. Signs of robbing include frantic activity at the entrance, fighting bees, and sudden loss of stores.
Reduce the entrance to make the hive easier to defend, and remove any attractants (open containers of honey or syrup nearby).
Absconding
Occasionally, a colony simply leaves. This is more common in the south with Africanized genetics and with swarms you’ve caught.
If your hive absconds, it’s usually due to pests (small hive beetles or mites), inadequate food, or disturbance. It’s not always something you did wrong.
Your Hive Doesn’t Have To Be Perfect From Day One
Every beekeeper loses colonies. It’s part of the learning curve, and it doesn’t mean you’re doing it wrong. What separates beekeepers who stick with it from those who quit is how much they learn from each inspection… and from each loss.
The best thing you can do in year one is stay curious and stay consistent. Open the hive. Watch what’s happening. Get comfortable with what a healthy brood pattern looks like and what a healthy cluster sounds like.
Join your local beekeeping association if you haven’t already; mentorship from an experienced beekeeper in your region is worth more than any book.
Bees will teach you most of what you need to know. You just have to show up and pay attention.
Once you’ve got the basics down, think about what else you can do to support your bees and the broader pollinator community around your homestead.
Planting specific plants for pollinators is a good place to start; the right forage opportunities make a real difference in colony health and productivity.