
Building your first chicken coop is one of those projects that looks straightforward until you’re standing in the hardware store trying to figure out if you need 1/2-inch or 1-inch wire mesh.
There’s more to it than hammering some boards together, and the decisions you make upfront about size, ventilation, and predator-proofing will determine whether your flock stays healthy and safe for years.
You don’t need to be a carpenter or spend a fortune. A solid starter coop for four birds can be built over a weekend with basic tools and under $300 in materials.
But before you cut a single board, it’s worth taking the time to understand what your birds actually need and what mistakes first-timers almost always make.
This guide covers everything, including sizing, ventilation, roost bars, nesting boxes, predator-proofing, a simple materials list, and the most common DIY mistakes to avoid. Soon, you’ll know how to build a chicken coop like a seasoned expert.
Before You Build: The Questions That Shape Your Coop
A good coop starts with a plan, and a good plan starts with a few decisions.
- How many birds are you starting with? Your coop size is driven by flock size. If you’re starting with four birds but think you might expand to eight, build for eight now. Retrofitting a coop is a pain.
- Do you have a run, or will your birds free-range? A dedicated enclosed run changes your space requirements significantly. Birds confined to a coop-and-run setup need more indoor space than birds who have access to open pasture during the day.
- What’s your climate like? Cold climates need better insulation and less drafty ventilation. Hot climates need maximum airflow. Where you live shapes almost every design decision.
- What predators are in your area? Raccoons, foxes, possums, weasels, hawks, snakes, and dogs each require different countermeasures. Knowing your local predator pressure helps you design the right predator defenses from the start.
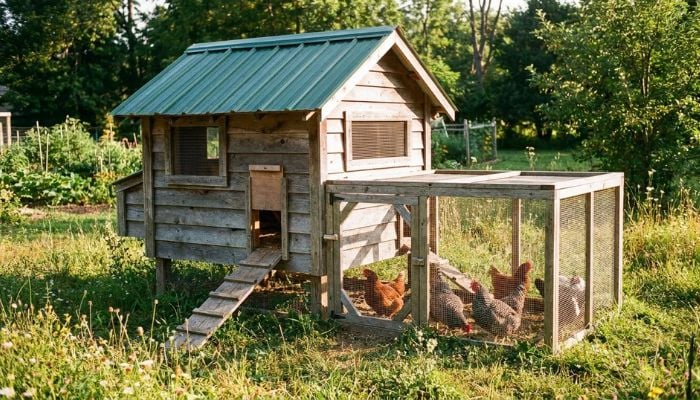
How Big Should a Chicken Coop Be?
This is where most beginners go wrong. When you’re looking at chicken coop plans or kit options, the sizes listed often meet minimum requirements, but minimum isn’t comfortable, and crowded birds are stressed, sick, and more likely to develop bad behaviors such as feather-picking.
The standard rule is 4 square feet of interior coop space per bird. For a flock of four, that’s a minimum of 16 square feet inside the coop itself. If your birds will spend time in a covered run, add 10 square feet of run space per bird on top of that.
For a 4-bird starter flock:
- Coop interior: 16 sq. ft. minimum (a 4×4 or 4×5 footprint works well)
- Run: 40 sq. ft. minimum (a 4×10 attached run is a common starting point)
If you’re in a cold climate where birds may be cooped up for days at a time during bad weather, err on the larger side. Crowded, bored chickens confined in a small space peck at each other, which can escalate into serious injury quickly.
Essential Features Every Chicken Coop Needs

Sizing is just the beginning. A properly designed coop has several non-negotiable components, and skipping or skimping on any of them creates real problems.
Ventilation
Proper ventilation is the single most important feature of a good chicken coop… and the one beginners most often get wrong.
Chickens produce an enormous amount of moisture and ammonia through respiration and waste. Without adequate airflow, moisture builds up inside the coop, creating the perfect conditions for respiratory disease and frostbite.
Ventilation openings should be positioned near the top of the coop walls or in the roofline, high enough that birds aren’t sleeping in a direct draft but open enough to move stale air out continuously.
A good rule of thumb is 1 square foot of ventilation per 10 square feet of coop space, though more is generally better.
Common ventilation solutions include ridge vents, gable vents, or rows of 1-inch hardware cloth windows near the roofline. The key is to allow fresh air in and moisture out without creating a wind tunnel at roost level.
Roost Bars
Chickens sleep on roost bars because they instinctively want to be elevated at night, off the floor. A coop without roost bars will have birds stacked on top of each other, stressed, and dirtying each other with droppings.
Design roost bars with these basics in mind:
- 8–10 inches of bar space per bird. In a 4-bird coop, that’s about 3–4 feet of linear roost space.
- Height matters: Roosts should be 18–24 inches off the floor at a minimum. If you have multiple bars, step them like stairs so birds can hop up. Avoid placing one bar directly above another.
- Bar width: Flat bars (2×4 lumber laid flat) are better than round dowels. Flat perches let birds cover their feet with their body for heat in winter, reducing frostbite risk.
- Keep roosts higher than nesting boxes: Chickens always want the highest spot. If nesting boxes are higher than roosts, they’ll sleep in the boxes and soil them, which is a mess you don’t want.
Nesting Boxes
Nesting boxes are where hens lay their eggs. The standard ratio is one nesting box for every 3–4 hens. A 4-bird flock needs at least 2 boxes, though in practice, hens often have a favorite and will queue up rather than use all available boxes.
- Standard nesting box dimensions: 12 inches wide × 12 inches deep × 12 inches tall. Larger breeds (Buff Orpingtons, Plymouth Rocks) appreciate 14×14.
Mount nesting boxes on an interior wall, lower than the roost bars, with a small lip or lip board at the front to keep bedding and eggs inside.
External access boxes, where you can collect eggs from outside without entering the coop, are a popular option that makes daily egg collection much easier.
Flooring
The right coop floor keeps moisture out and makes cleanup manageable. Common options include:
- Dirt floor: Inexpensive and natural, but allows predators to dig in and creates moisture problems. Only works well with active management.
- Hardware cloth over a frame: Good airflow and easy cleanup, but cold in winter, so not great for colder climates.
- Wood floor with deep bedding (the deep litter method): The most popular option. A raised wood floor keeps moisture and predators out. When covered with 3–4 inches of pine shavings, sawdust, or straw, it stays dry and odor-controlled with weekly stirring.
- Concrete: Extremely durable, easy to clean, and predator-proof, but it’s expensive, cold, and hard on feet over time. Better suited to large operations.
For most backyard coops, a raised wood floor with pine shaving deep litter is the best balance of practicality, cost, and chicken comfort.
The Coop Door
Your chicken coop needs both a large human-access door (for cleaning and inspection) and a small pop door for the chickens themselves. The pop door should be large enough for birds to pass comfortably: 10×10 inches is standard, 12×12 for larger breeds.
Automatic pop door openers are worth the investment. A solar-powered automatic opener that opens at dawn and closes at dusk removes the single most common cause of predator attacks on backyard flocks: someone forgetting to close the coop at night.
Predator-Proofing Your Coop
Predators are the number one cause of flock loss for backyard chicken keepers, and a poorly built coop is an invitation. Building it right the first time saves you a lot of heartbreak.
The most critical predator-proofing decisions you can make include:
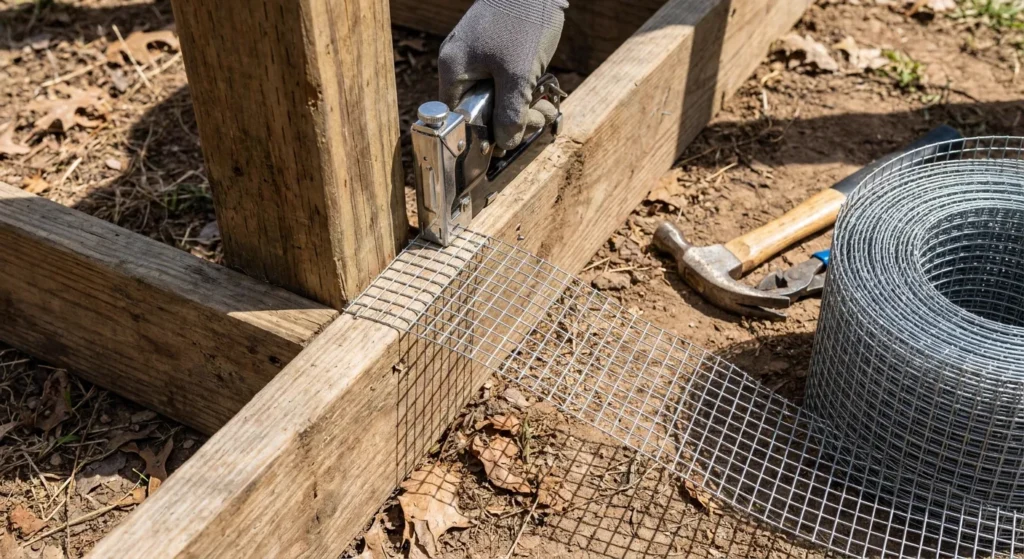
- Hardware cloth, not chicken wire. This is one of the most important things to understand before you build. Chicken wire is designed to keep chickens in, not to keep predators out. For all openings, runs, and windows, use 1/2-inch welded hardware cloth. It’s stronger and more durable, and it actually stops predators.
- Bury or apron the wire. Foxes, coyotes, and dogs will dig under a run. Either bury your hardware cloth 12 inches down around the perimeter, or lay it flat on the ground extending outward 12–18 inches (called an apron or L-footer).
- Secure all latches. Raccoons can open simple hook-and-eye latches. Use carabiner clips or spring-loaded latches on all doors. If a raccoon can figure out a latch with its hands, it will.
- Cover the run. Hawks are a real threat, especially for smaller breeds and bantams. A covered run with hardware cloth or welded wire over the top eliminates aerial predator access.
- Check for gaps. Weasels, minks, and rats can squeeze through openings as small as 1 inch. Inspect your coop carefully for any gap that size or larger and seal it.
Simple Materials List for a 4-Bird Starter Coop
A basic 4×4 coop with an attached 4×8 run, enough for a small backyard flock of four standard-size hens, can be built with the following:
Lumber:
- 2×4 framing lumber (12–14 8-foot boards for the coop frame)
- 1×6 or 1×8 boards for siding and nesting boxes
- 4×4 posts for corner supports (if building with a permanent foundation)
- 2×4 flat lumber for roost bars
Hardware and fasteners:
- 1/2-inch welded hardware cloth (at least 50 feet for windows, ventilation, and run)
- Galvanized screws and nails (3-inch and 1-1/2-inch)
- Heavy-duty hinges for doors (at least 2 per door)
- Spring-loaded latches or carabiner clips for all doors
Roofing:
- Corrugated metal roofing or asphalt shingles, whatever fits your budget and aesthetics
- Roofing screws or roofing nails
Finishing:
- Exterior-grade paint or wood sealer (helps the coop resist moisture and last longer)
- Pine shavings for deep litter bedding (one large bag to start)
The total cost for materials typically runs $150–$300, depending on your local lumber prices and whether you have existing tools and hardware. Coop kits are available if you’d rather skip the full build. They run $200–$600 for a kit sized for 4–6 birds, though quality varies widely.
The Most Common DIY Chicken Coop Mistakes
After sizing and predator-proofing, the things that trip up beginners are almost always the same. Avoid these:
- Building too small. The most common mistake. Chickens need more space than you think. If you’re on the fence between two sizes, go bigger.
- No ventilation. A sealed, “cozy” coop leads to a sick flock. Moisture and ammonia buildup cause respiratory illness fast. If your coop doesn’t have dedicated ventilation at the top of the wall, not just a drafty gap somewhere, add it before birds move in.
- Using chicken wire instead of hardware cloth. Already covered, but worth repeating. Chicken wire is not predator-proof. Use 1/2-inch hardware cloth everywhere.
- Nesting boxes higher than roost bars. Chickens roost in the highest available spot. If the nesting boxes are higher than the roost bars, you’ll be cleaning soiled eggs and nesting boxes every day. Keep roost bars at least 6 inches higher than the tops of your nesting boxes.
- No overhang on the roof. A roof without an overhang lets rain splash directly down the exterior walls and against ventilation openings, driving moisture into the coop. A 6–12 inch overhang makes a big difference.
- Skipping the automatic pop door. You’ll forget to close the coop one night. It’s not a matter of if; it’s when. An automatic opener pays for itself the first time it saves your flock.
- Using pressure-treated lumber inside the coop. Older pressure-treated lumber contains arsenic compounds that are toxic to birds. For interior framing, nesting boxes, and roost bars, use untreated wood. Pressure-treated wood is fine for exterior posts in contact with the ground.
- No lighting plan for winter. This one’s more optional but worth knowing: hens need 14–16 hours of light per day to maintain egg production. In winter, you can supplement with a simple timer-controlled bulb inside the coop. Skipping this isn’t a mistake (some people prefer to let hens rest in winter), but it’s worth knowing that the option exists.
Should You Build from Scratch or Buy a Kit?
Both approaches work, and the right answer depends on your skills, time, and budget.
Build from scratch if you’re handy, have basic tools, and want to customize the layout exactly for your space. Scratch-built coops almost always end up more durable and better-sized than prefab kits at the same price point.
Buy a kit if you want to get started quickly, don’t have carpentry experience, or just want a no-fuss option. A quality coop kit (brands such as Omlet or Precision Pet are popular) can be assembled in an afternoon.
Just know that many kits are sized smaller than advertised. A “4-bird” kit often works better for 2–3 birds in practice. Read reviews before you buy.
A middle-ground option is to find a solid free plan online (university extension services and backyard chicken forums are good sources) and build to the plan. You get the customization of a scratch build without having to design from scratch.
Protect Your Flock With a Well-Designed Coop From Day 1
A well-built coop is one of the best investments you can make in your backyard flock. Get the size right, nail the ventilation, use the right wire, and your birds will stay healthy and safe for years without constant intervention.
If you’re still deciding which breeds to get before you build, our guide to the best chicken breeds for beginners covers the top picks for temperament, egg production, and hardiness, including which breeds need a little more space.
Once your coop is set and your flock is established, our guide on what to feed backyard chickens walks through exactly what your birds need at every stage to stay productive and healthy.
Build it right the first time. Your flock will thank you.