
Bokashi offers numerous advantages for both your garden and the planet. But what is it exactly?
Bokashi is an anaerobic composting method, which works much faster than most traditional approaches. Unlike with most compost, you don’t have to turn it or worry about the internal temperature. You use Bokashi Bran to pickle your food scraps, turning them into a nutrient-rich food source for your soil organisms.
This article will tell you everything you need to know to get started with Bokashi. I’ll also give you an honest insight into the benefits and drawbacks of the method, so you can work out if it’s the best choice for your situation. Let’s get started!
Bokashi Composting: How It Works
There are two stages in the bokashi compost process:
- Fermenting your food scraps with Bokashi bran
- Burying your Bokashi until it’s fully broken down
The great thing about Bokashi is you can compost pretty much anything, including things you can’t put in other composters. That includes citrus fruits, meat, and dairy. You can also safely compost things like animal poo, which can very interesting for pet owners who want to deal with that waste responsibly.
It will take a couple of weeks for the scraps to ferment, and then you will bury them for another couple of weeks before they are fully broken down. That means the entire process takes around a month, which is a lot faster than a standing compost pile, which can take up to a year!
What Is Bokashi Bran?
Bokashi Bran is what you use to ferment your food scraps. It is usually waste bran from the beer industry, so you are repurposing food scraps from the brewery and at home.
That leftover bran has been inoculated with lactobacillus, a good bacteria that is actually used to treat some illnesses such as diarrhea.
Your food scraps will still be very much visible in your finished Bokashi. You might even think that nothing has happened. Don’t worry; it’s not until you bury your Bokashi for a couple of weeks that it will fully break down into compost.
Bokashi vs. Compost
People frequently refer to Bokashi as Bokashi composting, including me!
But if we are getting technical about it, Bokashi is fermenting, not composting. The fermented food scraps need to further break down in the soil before they can be called compost. While the Bokashi breaks down beneath the ground, we do not plant seedlings in that raised bed.
That is because Bokashi is on the acidic side and can burn your plants. But after 2 weeks have passed, the pH should be back to normal. Now your soil will be rich in organic matter and nutrients, and your plants are going to thrive.
Getting Started With Bokashi
Getting started with Bokashi is pretty straightforward. You don’t have to worry about which food types you put into your bin, and you don’t need to turn the pile or check temperatures. So for a beginner to composting, Bokashi is a great place to start.
What You’ll Need
You don’t need loads of equipment to get started with Bokashi! All you need is:
- A Bokashi Bin (or make your own)
- Bokashi Bran (non-negotiable!)
- Food Scraps
Making your own Bokashi bin isn’t too complicated, and you might want to give it a go if you want a second bin once your first one is full. Having said that, Bokashi Bins are pretty inexpensive, and they have a helpful tap for siphoning off the tea.
How To Make Bokashi Compost: Step-By-Step Guide
You’ll need to have your Bokashi Bran and some food scraps to hand to get started. It can also be helpful to have a cup or small scoop for your bran.
1. Sprinkle Base With Bokashi Bran
You’ll start by sprinkling a thin layer of Bokashi Bran at the bottom of your bin. It doesn’t have to be really thick, but you shouldn’t see the bottom of your container anymore.
2. Add A Layer Of Food Scraps
You can now add your first layer of food scraps. Remember to cut the scraps into smallish pieces if you have a lot of big chunks, and you want that first food layer to be a couple of inches thick.
You will then press down on that layer to push out any air (you might prefer to do this with a small garden trowel for hygiene reasons, but you can use your gloved hands too). As a household of two, I would add my scraps every two days to prevent it from getting moldy.
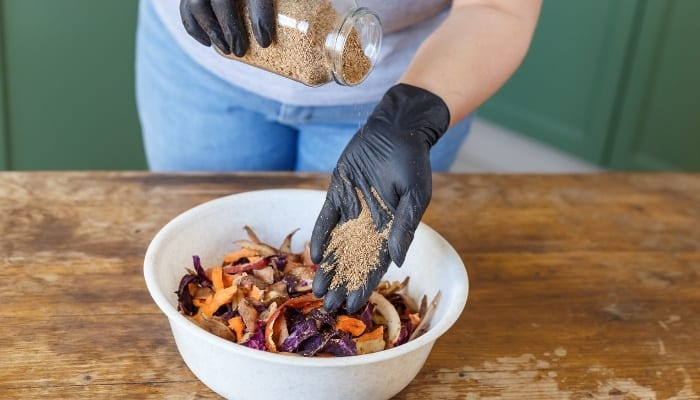
3. More Bokashi Bran!
Now you add more Bokashi bran, ensuring all the food is covered with a thin layer. After adding every layer of food scraps, you will sprinkle another layer of Bokashi bran.
4. Cover Or Continue
If you have plenty of food scraps, keep layering with Bokashi bran. But if you just had a couple of days worth, you can put the lid on and wait until you have more to add to your bin.
Ensure the lid is closed correctly to stop oxygen from getting there, and I recommend popping a cover directly on the food and bokashi bran, such as a plastic sheet. Open up the tap every few days to remove any liquid. (More on the Bokashi tea later)
5. Fill Up Your Bucket
Keep going until your bucket is full, remembering to finish with a layer of Bokashi Bran!
6. Leave To Ferment
Now your bucket is complete, you can put it to one side for two weeks to ferment. Don’t leave it out in the sun. You can keep it inside because it should not smell. (If it does smell bad, something has gone wrong!)
Don’t forget to keep siphoning off any liquid. Once the liquid is coming out a very dark color, you have Bokashi tea. That can be diluted with 100 times more water than tea and used on indoor or outdoor plants. They will be thankful for the nutritious drink!
The first liquid coming out might be more watery, and I would just dump this out in my yard or pour it down the sink.
7. Open It Up
After two weeks of fermenting, I would open up my Bokashi bin and make sure all is good. It should have a pleasant, pickled aroma. It’s ok if there is some white mold in there, that’s normal!
It’s also normal for the food scraps to still look the same as when you put them in there. Remember, you have fermented them, not composted them.
8. Bury Your Bokashi
The composting happens outside. You bury your Bokashi about 12 inches deep in trenches. This could be in your flower beds or raised veggie containers. You can even do this in smaller pots.
You will leave this undisturbed for two more weeks before planting anything, as you could burn your seedlings if you put them in too soon. Don’t forget to wash out your bin once it is empty!
9. Check Progress
After two weeks, dig up your trenches and see what’s going on. You will see a small amount of the original foodscraps, but it should be greatly reduced. You should notice the earth is looking nice and healthy thanks to all those nutrients and organic matter.
10. Plant Your Seedlings
Fill in your observation hole, and you can now plant your seedlings on top of the trenches. Some people will mix and turn the soil. No dig gardeners will just plant straight into the soil surface.
Bokashi System Maintenance
The Bokashi system is pretty simple, and you don’t need to worry about lots of maintenance. But here are a couple of dos and don’ts to be aware of.
Do
- Pour some water into your bokashi bin before starting to make sure it isn’t leaking. Pour it out when you know it’s water-tight.
- Store your bin in a cool, dark place when the food is fermenting.
- Be generous with the Bokashi Bran
- Have a second bin ready, so you don’t have to stop for two weeks during fermentation.
Don’t
- Add water alongside your food scraps; it’s not necessary.
- Use harsh chemicals like bleach to clean your bin, the lactobacillus won’t appreciate that!
Best Bokashi Compost Kit
If you can’t decide which Bokashi Compost Kit to go for, here are a few suggestions for you to check out!
Bokashi Living Starter Kit

I think the Bokashi Living Starter Kit is your best choice. You have two separate Bokashi bins to get you started, so you don’t have to take a 2-week break after filling your first bin. It also comes with two sacks of high-quality Bokashi bran, and the built-in taps make extracting your compost tea a lot cleaner and more straightforward than with homemade models.
I also really appreciate the one-year warranty on this product and the fact that every part of the bins is replaceable. So if you do accidentally break anything, you don’t have to send the whole system to a landfill.
Pros
- Two bins for continuous fermenting
- Comes with Bokashi bran
- Warranty and replaceable parts
Cons
- Some people might prefer to start with one bin
All Seasons Indoor Composter

If you’d prefer to start with a single Bokashi bin, I would go for the all seasons indoor composter. It also comes with Bokashi Bran and a built-in tap, but it doesn’t have the plastic cover for inside the bin that my first recommendation has.
This isn’t a disaster, as you can use a bit of tarp or an old plastic bag to make sure the food scraps stay anaerobic.
This is a simple and effective Bokashi Bin, but a couple of users said they had problems with the tap leaking. You can place a cup under the tap just in case, and then you don’t need to worry. Don’t forget that you’re supposed to drain the liquid every few days, so the problem may have been more to do with user error.
Pros
- Comes with Bokashi Bran
- Single bin for beginners
- Built-in tap
Cons
- Potential tap leaking
Sunwood Life Bokashi Compost Kit

The final Bokashi Bin I’d like to recommend comes from Sunwood life. As well as the bin and Bokashi Bran, you also get a small food scraps container for your kitchen. This will keep smelly and unsightly food out of the way until you’re ready to ferment it. (Just make sure you deal with it every couple of days to prevent mold!)
It also comes with a tool to help press down your food scraps and get out any air. This isn’t wholly necessary, because you could use a small garden trowel. But it’s definitely nice to have something compact for that job, so you don’t start filling your kitchen with garden tools!
Pros
- Comes with Bokashi Bran
- Container for food scraps
- Compression tool included
Cons
- Bonus kit adds to price
What To Add to a Bokashi Bin
You can add pretty much any food scraps to a Bokashi bin.
That includes:
- Fruits (including citrus fruit!)
- Vegetables
- Pasta, Rice, CousCous, etc
- Bread
- Meat and small bones
- Dairy
You can also add cat and dog feces, which are hard to deal with otherwise. Bokashi is a much safer solution than general compost, as you don’t have to worry about the pests and pathogens.
Can I Put Moldy Food in Bokashi?
You should not put moldy food in your bokashi bin. That would introduce fungi and bad bacteria that could outcompete the lactobacillus in anaerobic conditions. For this reason, you’d be best off adding scraps to the Bokashi bin every 2 days max.
Can I Put Meat in Bokashi?
Yes, you can put meat and small bones in the Bokashi bin. Don’t put them in if they have gone bad, though. Large bones aren’t the best to go in the Bokashi Bin as it will be hard for the bacteria to break them down properly. You can also include fish and fish bones.
Can I Put Cooked Foods in Bokashi?
Yes, cooked foods, as well as raw foods, can go in your Bokashi bin!
What Can You Not Put in Bokashi?
Do not put moldy food or very large food scraps into your Bokashi Bin. For example, I would cut a large potato into at least 6 pieces before putting in to ferment. You should avoid putting large quantities of oil in the bin, but small amounts included with cooked food will be fine.
Frequently Asked Questions
Hopefully, you’ve got a pretty good understanding of Bokashi by now. Here are a few FAQs to clear up any doubts you might have.
How Long Does Bokashi Take To Decompose?
It takes a month to make Bokashi compost. Your food scraps need two weeks to ferment and then two weeks to decompose in the earth. It could take a bit longer in very dry conditions or unhealthy soil, because microbial life is necessary to complete the process.
Can You Keep a Bokashi Bin Outside?
You could keep your Bokashi Bin outside in a pinch, but you’d have to make sure it was well shaded. Considering Bokashi does not smell or take up much room, you’d be better off keeping it inside.
How Do You Know When Bokashi Is Ready?
Bokashi should smell like a pickle when it’s ready. The food scraps will still be fully visible, though!
Does Bokashi Go Bad?
If your Bokashi smells terrible, it usually means that there wasn’t enough Bokashi Bran in there, or perhaps the food scraps you added were already too moldy. If the Bokashi stinks, it’s not good to use in the yard. You’d be better off throwing it away and starting again.
Is Bokashi Tea Good for Plants?
Bokashi tea offers great nutrition for plants, but only if it’s well diluted. I would dilute my tea at a ratio of 100:1, to make sure it doesn’t burn my plants.
How Long Can You Keep Bokashi Tea?
I would use my Bokashi tea the same day that I harvest at it. At a push, you could use it the day after you collect it, but the sooner you use it the better.
Why Does My Bokashi Smell?
If your Bokashi smells, it means that your food started rotting rather than fermenting. You should consider if you used enough Bokashi Bran and whether your food was already bad when added to the mix.
How Deep To Bury Bokashi
Bury your Bokashi around 12 inches deep. This will prevent you from attracting too many hungry animals and protect the pH at the soil surface.
Bokashi Bran Alternatives
Some people use EMA (activated effective microorganism) solution for Bokashi. It’s a possibility for people living in small spaces that don’t want to store the Bran. You would have to dilute the solution with some molasses and plenty of water, so it can make your Bokashi somewhat moist.
How To Clean a Bokashi Bin
To clean my Bokashi Bin, I would just rinse it out with plenty of water. I wouldn’t use any harsh chemicals, but I would use some warm and soapy water if my Bokashi had gone bad. Use a sponge or cloth to remove any biofilm, but don’t worry about scrubbing really hard.
Final Thoughts
Bokashi composting is a great way to deal with food scraps responsibly, especially if you live in a small space such as an apartment. It doesn’t smell, and it works quickly compared to classic techniques.
We must compost our food scraps rather than sending them to landfills, where they become a significant source of toxic greenhouse gases as they decompose in inappropriate conditions.
Bokashi Composting is a straightforward way we can make a difference for the earth, and feed our plants lots of goodness at the same time!