
As we strive for increased self-sufficiency, the interest in hydroponic gardening is steadily increasing among beginners. The drip system remains an easily accessible and favored technique in hydroponics.
But how exactly does a drip system work?
What is a hydroponic drip system? A hydroponic drip system helps small and commercial gardeners deliver nutrients to plants using an active micro-irrigation system. This uses a water pump and small emitters to trickle nutrient solution directly onto each plant, allowing growers to deliver moisture and food using less water.
Hydroponic Drip System Pros & Cons
There are two main variations on the hydroponic drip system that provide different benefits depending on your use and operation size.
We’ll explore all this and more in greater detail below – here’s everything you need to know before setting up your first drip system.
Understanding Hydroponic Drip Systems
Drip systems can be used for small- or large-scale operations and benefit various plants. Let’s find out how they work, the basic equipment, and more – plus, an answer to common questions.
What Is a Hydroponic Drip System?
Hydroponic drip systems are a water-efficient form of low-flow irrigation that steadily delivers a water-based nutrient solution to individual plants.
Moisture drips slowly into the base of the plants instead of through overhead irrigation, which loses a lot of moisture through evaporation.
Drip systems can be set up manually to provide low-flow watering to plants in separate containers as and when they require it.
You can also create an automated system with a cycle timer to sufficiently soak the growing media before turning off at a precise time to allow the excess solution to drain.
How Does a Hydroponic Drip System Work?
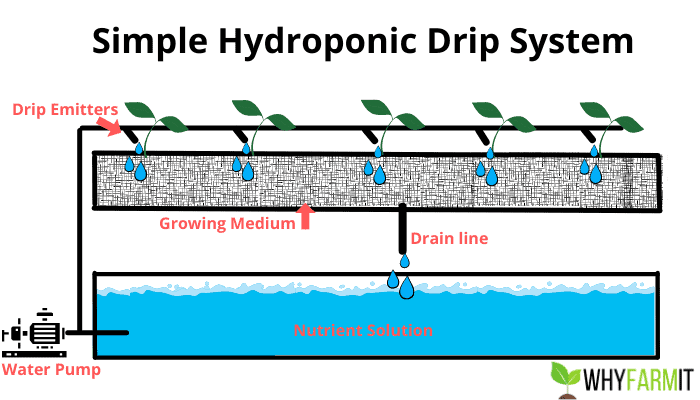
A ventilated, nutrient-rich water reservoir positioned at the base of the plant’s growth tray sends the solution via a water pump through a series of tubes or drip lines, which then feed the plants via small nozzles known as drip emitters.
The drip lines/emitters are positioned close to the growing medium to reach the root mass, thus conserving water.
Depending on the type of drip system used, any excess solution that isn’t absorbed by the plant’s roots once it filters through the growing media will either return to the reservoir to be re-used or be discarded.
Basic Components of a Hydroponic Drip System
- Water pump: A submersible water pump (best for small-scale growers) or inline pumps for larger setups.
- Water tank/reservoir: Large 10-20 gallon bin/bucket to hold the nutrient solution. Preferably opaque to discourage algae growth.
- Thin tubing: Spaghetti tubing with holes poked at intervals to act as makeshift drip emitters. Ideal for small/hobby operations.
- PVC tubing: Main line transporting the solution from the pump to the emitters. 2-inch tubes will suffice for small setups.
- Drip emitters: Nozzles connected to the main PVC drip lines – best only if you have a large number of plants.
- Hydroponic growing medium: Substrate, like coco coir, to support plant roots and deliver oxygen.
- Aquarium-grade silicone: Sealant to waterproof the connections between the water pump, tubing, and reservoir.
- TDS/Total Dissolved Solids meter (optional): Alerts you to low nutrient solution levels after each watering cycle
- Plant pots with drainage holes
- Hydroponic plant tray
- Pump timer
Additionally, if you plan to set up a drip system in settings with insufficient natural light, you’ll need to install grow lights, like these full spectrum light strips, to simulate sunlight.
Many are available with varying strength settings and timers for greater control.
Types of Hydroponic Drip Systems
Based on how you plan to deal with the excess water in your setup, there are two distinct versions of hydroponic drip systems – Recovery and Non-Recovery:
Recovery (Recirculating) System
This system allows wastewater that isn’t taken up by the plant’s roots to flow back into the reservoir where it can be recirculated for use in the next water cycle.
Pumping the wastewater back through the drip emitters is very efficient and ideal for modest, home-based systems, but the recirculation of nutrients will mean that pH levels are affected over time and will need to be monitored.
Non-Recovery (Non-Circulating) System
Non-recovery systems allow unused water to run-off as waste, making this a desirable option for commercial setups.
Large-scale drip systems have the budget to minimize waste using highly-accurate timers to control the flow.
While this system spares hobbyists the hassle of amending pH levels, they will need precise timing to prevent nutrient buildup.
Benefits of a Hydroponic Drip System
- Being adaptable to expansion
- Inexpensive and easy to install
- Automated control to deliver precise watering schedules
- Low maintenance compared with other hydroponic systems
- Moisture-retentive growing medium means plants won’t suffer during power outages/malfunction
- Beneficial to a wide variety of plants
Drawbacks of a Hydroponic Drip System
- Non-recovery type systems require precision timing
- Recovery types require pH/nutrient level monitoring
- Unlike passive hydroponic systems, drip setups depend on electricity and moving parts
- Drip emitters become clogged with algae growth/nutrient mineral buildup
Plants That Can Be Grown in a Hydroponic Drip System
Because drip systems can adapt to large-scale operations, they are able to support a much wider range of plants than most hydroponic styles.
California-based water technician John Woodward at Fresh Water Systems also explains that drip systems “hold larger quantities of growing media than other hydroponic setups, allowing them to support the larger root systems of these plants.”
Here are some of the easiest plants you can grow in a drip system:
- Lettuce
- Herbs
- Spinach
- Strawberries
- Bell peppers
- Pothos
- Philodendrons
- Cucumbers
- Zucchini
- Tomatoes
- Pumpkin
- Melons
- Onions
- Peas
Is a Hydroponic Drip System Good for Home Gardeners?
Absolutely! If you have sufficient space (a large enough greenhouse or enclosed indoor structure) and have a relatively small number of plants to cater for, a drip system can be a great option for beginner growers at home.
Ensure that outdoor drip systems are protected against strong winds and positioned on level ground so that the reservoir always delivers an even amount of nutrients.
There are many starter kits available for beginners to trial a drip system.
How Much Does a Hydroponic Drip System Cost?
The cost of a drip system ranges anywhere between $150-$10,000. Expenses depend entirely on your budget and preferred setup scale. Here’s a brief rundown of the typical costs:
Hydroponic Drip System Watering Schedule
Your watering schedule will depend on a few factors such as the individual plant’s irrigation needs, the age/size of the plants, and fluctuations in humidity due to weather changes.
To keep things simple, start out with low-maintenance, easy-to-grow plants and set your hydroponic drip timer to turn on and off 2-3 times a day delivering the desired amount of water to saturate the growing media with little waste.
Once your budget and scale allows, you can then consider investing in sophisticated drip emitters with mechanisms that allow you to adjust the solution output according to the needs of each individual plant.
How Much Water Does a Hydroponic Drip System Use Per Hour?
The average drip system typically uses between ½ and 4 gallons per hour.
The hourly water usage depends upon whether you install low- or high-pressure drip emitters, and most drip emitters are in the range of ½-3 gallons per hour according to the Texas A&M University AgriLife Extension.
What Growing Medium Is Best for Hydroponic Drip Systems?
Drip systems require a substrate that can hold in moisture while providing decent air circulation and good drainage.
This helps to prevent would-be wastewater or recirculated solution from waterlogging the roots, risking rot and other maintenance headaches.
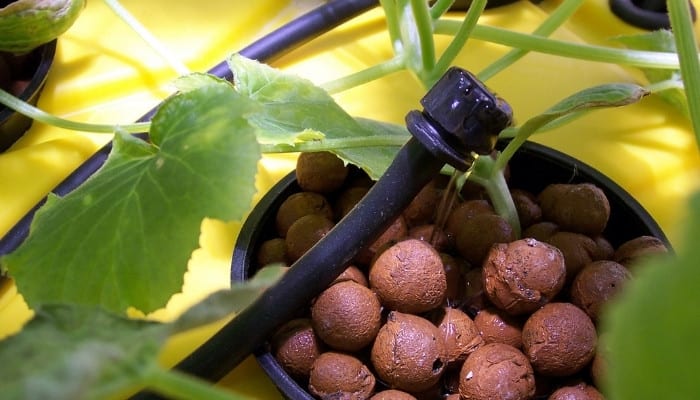
Expanded Clay Pellets
These are small, reusable balls made from heated clay ranging from 1-18 mm in size. They’re pH neutral and have an aerated core to deliver ample oxygen to plant roots.
They can be used in multiple water cycles before breaking down, but be vigilant, as clay particles can clog emitters.
Grow Stones
These are light stones made from recycled glass which retain around 30% moisture and have twice the aeration of perlite (volcanic rock).
These are a great choice for large plants as they come in sizes weighty enough to hold vegetable roots in place.
Coco Coir
This is fiber taken from the outer husk of coconuts. It’s 100% organic, has natural disease resistance, and is great at retaining moisture between drip cycles.
It’s also biodegradable and renewable for several years.
Is a Hydroponic Drip System Good for Tomatoes?
Drip systems are the most popular hydroponic style choice for growing tomatoes. This works by delivering the nutrient solution to the base of buckets or bags where seedlings are planted.
Grow stones/perlite are ideal growing media as these have the size and weight needed to support tomato root systems.
How Many Emitters Can I Put on a Drip Line?
This will depend on the number of plants you wish to grow, their spacing, and size.
Typically, there will be 1-2 drip emitters per plant depending on the plant size, which may work out at 30 emitters per drip line if you had 15 large plants along one line of tubing.
How To Build a Simple Hydroponic Drip System
Once you decide on the growing medium and number of plants to grow, it’s simply a matter of assembling the basic equipment to try growing a successful drip system garden!
Everest Fernandez from Just 4 Growers gives you an idea below of how this can be set up in your home on a modest scale.
For now though, here’s a rundown of steps toward creating a simple Recovery-drip system.
You’ll need:
- A low, long opaque storage bin with lid
- 1 smaller storage tote
- 3½-gallon bucket with lid
- 1/4-inch spaghetti/vinyl tubing
- Hole drill saw kit
- Drain filter/strainer
- Small water pump & timer
- Plant pot & growing medium
- Nutrient solution
Step 1
Drill a large drain hole into the base of the bucket to allow run-off to drain into a reservoir and place a drain filter/strainer in the hole to prevent the roots/grow media from escaping.
Next, drill a hole in the bucket lid to conform to the size of your plant pot so it can snugly rest in the cavity.
Step 2
Cut a hole in the large storage bin lid to conform to the shape of the bucket and cover the reservoir beneath.
Fill the large storage bin/reservoir halfway with nutrient solution and place an upturned smaller storage tote in the reservoir for the bucket to stand on and stay elevated.
Step 3
Place the water pump inside the reservoir and connect it to the tubing. Make a small hole in the bucket lid close to where the plant pot will sit and thread the other tube end into this hole for a direct drip emitter.
Fill your plant pot with your chosen growing media, and place the plant pot inside the bucket lid hole.
Step 4
Lastly, attach the timer to the pump’s power source and set it to your preferred daily schedule e.g. 5 minutes 3 times a day.
Conclusion
To sum up, hydroponic drip systems are a flexible way to deliver nutrients to a wide variety of plants and can be scaled up or down depending on your budget and setup.
Maintenance can be straightforward or more complex based on the type of drip system you choose, but this form of hydroponics is accessible to all gardeners, whether you operate from a farm or an apartment!